How to Squat With Perfect Form: A Woman's Guide
Learning how to squat correctly involves standing with feet shoulder-width apart, engaging your core, pushing hips back, lowering until thighs are parallel to the floor, and driving through heels to stand. Proper form protects your knees and back while maximizing glute and leg activation for strength gains.
If you've ever felt intimidated by squats or wondered whether you're doing them right, you're not alone. The squat is one of the most powerful exercises for building lower body strength, sculpting your glutes, and improving functional fitness, yet it's also one of the most commonly performed incorrectly. Whether you're working out at home or in the gym, mastering how to squat with perfect form is essential for preventing injury and seeing real results.
This comprehensive guide will walk you through every aspect of proper squat technique, from foot placement to breathing patterns. You'll learn the exact steps to perform a squat safely, discover common mistakes that could be holding you back, and find answers to your most pressing questions about this foundational movement. By the end, you'll have the confidence and knowledge to squat with perfect form every single time.
Key Takeaways
- Proper squat form starts with correct foot positioning and core engagement before you even begin to lower
- Your knees should track over your toes, not cave inward, to protect your joints and maximize muscle activation
- Depth matters: aim for thighs parallel to the floor or deeper if mobility allows, but never sacrifice form for depth
- Common mistakes like lifting heels, rounding your back, or rushing the movement can lead to injury and reduced effectiveness
- Squats offer benefits beyond aesthetics, including improved circulation, hip mobility, and functional strength for daily activities
What You'll Need Before You Start
Before learning how to squat, gather these essentials to set yourself up for success. The beauty of squats is that they require minimal equipment, making them perfect for home workouts.
Essential Equipment
- Comfortable athletic shoes: Flat-soled shoes or barefoot training provides the best stability; avoid running shoes with cushioned heels
- Full-length mirror: Visual feedback helps you check form and alignment during practice
- Optional resistance: Dumbbells, kettlebells, or a barbell for when you're ready to add weight
- Yoga mat or stable surface: Provides grip and defines your workout space
Mobility Prerequisites
Before diving into squats, assess your mobility. You should be able to comfortably sit in a deep squat position without pain. If you experience tightness in your hips, ankles, or lower back, spend time on mobility work first.
Test your ankle mobility by standing close to a wall and trying to touch your knee to the wall without lifting your heel. If you can't, incorporate ankle stretches into your warm-up routine.
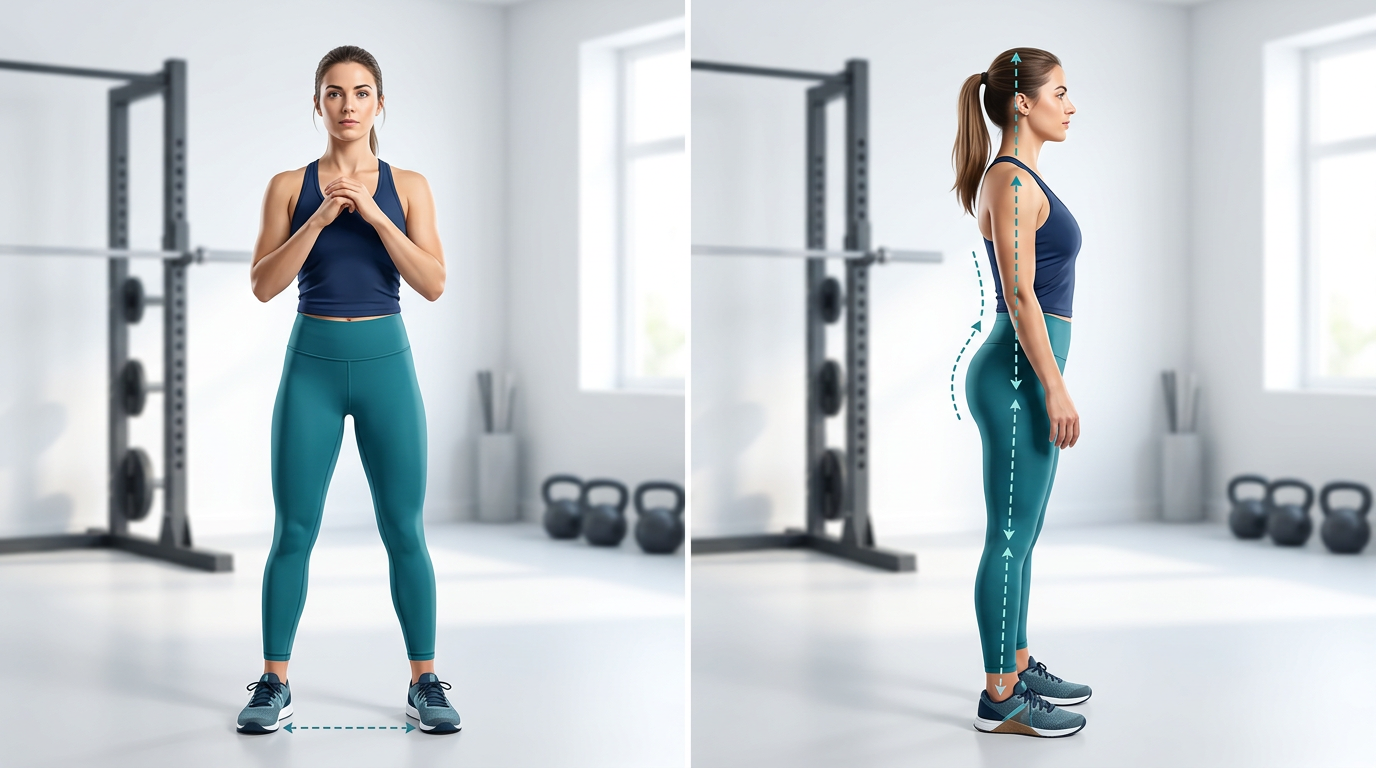
Woman demonstrating proper squat setup position with feet shoulder-width apart, showing correct foot angle and posture from front and side view
Step 1: Set Your Stance and Foot Position
The foundation of a perfect squat begins with how you position your feet. This seemingly simple step determines your balance, stability, and which muscles you'll emphasize during the movement.
- Stand with your feet slightly wider than shoulder-width apart
- Point your toes forward or slightly outward at a 5-15 degree angle, whatever feels natural
- Distribute your weight evenly across your entire foot, feeling contact at three points: big toe, little toe, and heel
- Keep your feet planted flat throughout the entire movement
Your stance width may vary based on your body proportions and flexibility. Women with wider hips often find a slightly wider stance more comfortable and effective for glute activation. Experiment to find what allows you to descend comfortably while keeping your knees aligned with your toes.
Pro Tip: If you're unsure about your ideal stance, try the jump test. Jump up a few inches and land naturally—wherever your feet land is typically your body's preferred squat stance.
Step 2: Engage Your Core and Set Your Posture
Core engagement is non-negotiable for safe, effective squats. Your core acts as a protective brace for your spine throughout the movement.
- Stand tall with your chest lifted and shoulders pulled back and down
- Take a deep breath into your belly, then tighten your core as if bracing for a punch
- Maintain a neutral spine—avoid arching your lower back excessively or rounding forward
- Keep your gaze forward or slightly upward to maintain neck alignment
- Let your arms extend forward for balance or hold them at chest level
Proper core engagement protects your lower back from strain and allows you to generate more power from your legs and glutes. Think of creating a rigid cylinder from your ribs to your hips that stays stable as you move.
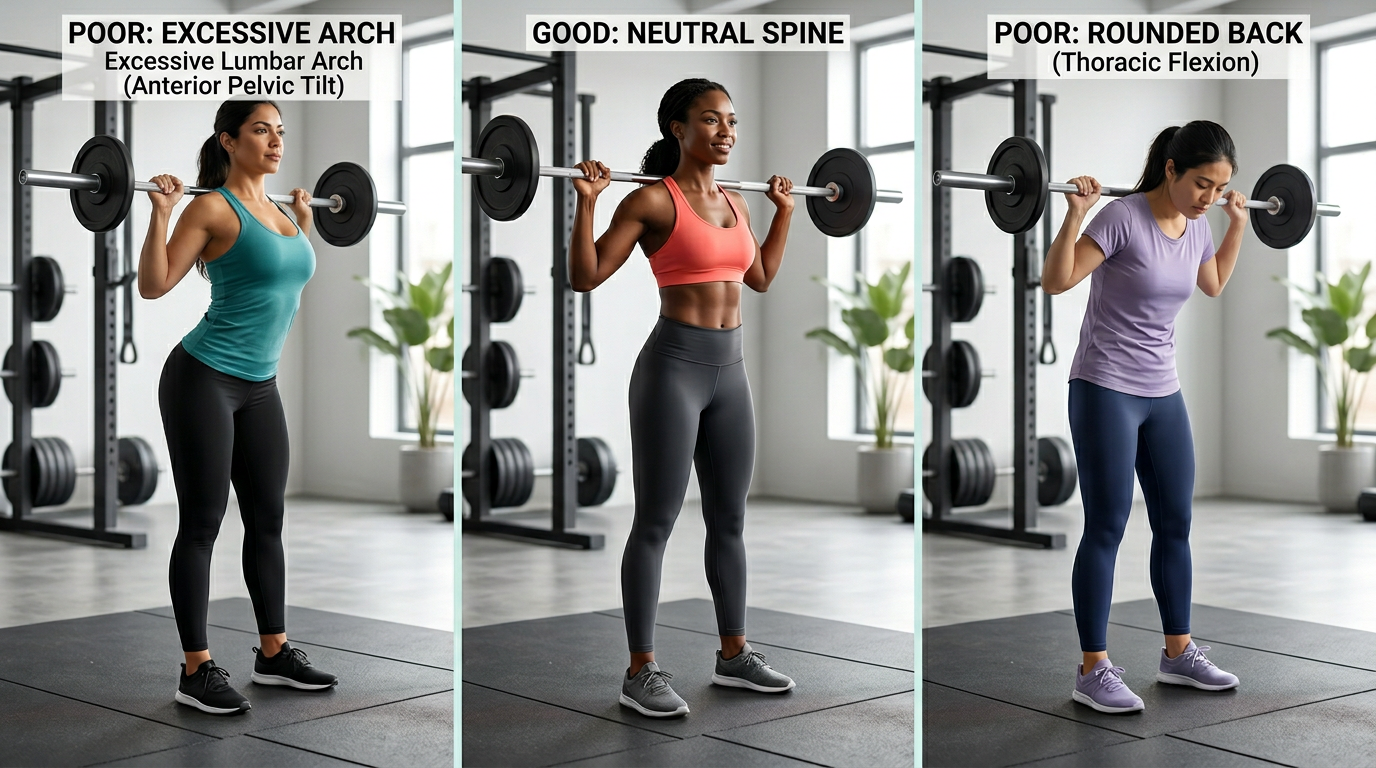
Side-by-side comparison showing correct neutral spine position versus common postural errors like excessive arch or rounded back during squat setup
Step 3: Initiate the Descent by Pushing Your Hips Back
The descent phase is where most form breakdowns occur. The key is to think of sitting back into a chair rather than simply bending your knees.
- Begin the movement by pushing your hips back as if reaching for a chair behind you
- Allow your knees to bend naturally as your hips move backward
- Keep your chest proud and core engaged as you lower
- Maintain the weight in your heels and midfoot—you should be able to wiggle your toes
- Lower with control, taking 2-3 seconds for the descent
This hip-hinge pattern is crucial for protecting your knees and maximizing glute engagement. When you push your hips back first, you naturally load your posterior chain—the glutes, hamstrings, and lower back—which are the primary movers in a squat.
Pro Tip: Practice the hip hinge by standing a few inches from a wall, facing away. As you squat, your glutes should lightly touch the wall before your knees bend significantly. This reinforces the proper movement pattern.
Step 4: Lower to Proper Depth While Maintaining Alignment
Depth is important, but never at the expense of proper form. Your goal is to find the sweet spot where you maximize muscle activation while maintaining safe joint positioning.
- Continue lowering until your thighs are at least parallel to the floor
- Ensure your knees track in line with your toes—they should move in the same direction
- Keep your knees behind or aligned with your toes, not excessively forward
- Maintain your neutral spine and upright chest throughout the descent
- Stop at a depth where you can maintain proper form without rounding your lower back
The ideal squat depth for most women is when the hip crease drops just below the knee, creating maximum glute activation. However, if mobility limitations prevent this depth, work within your current range while gradually improving flexibility.
Some women can comfortably squat deeper than parallel, which is excellent for glute development. Others may need to stop at parallel initially. Both are valid—listen to your body and prioritize form over depth.
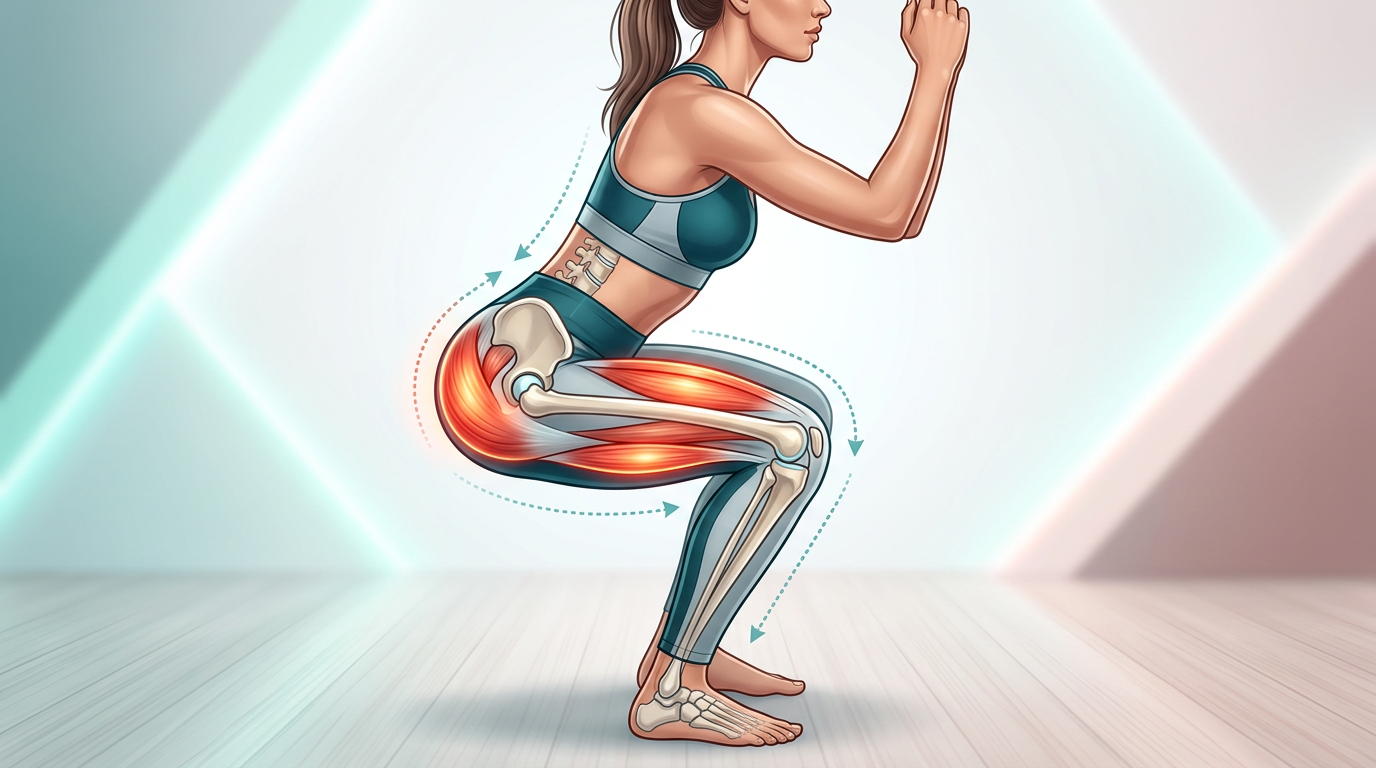
Anatomical illustration showing proper squat depth at parallel position with highlighted muscle activation in glutes, quads, and hamstrings, including knee and hip joint alignment
Step 5: Drive Through Your Heels to Stand
The ascent requires power and control. This is where you'll really feel your glutes and legs working to lift your body back to the starting position.
- Press firmly through your heels and midfoot to initiate the upward movement
- Drive your hips forward as you straighten your legs
- Maintain core engagement and keep your chest lifted
- Squeeze your glutes at the top of the movement
- Avoid locking your knees completely—maintain a slight bend
- Exhale as you push up, or hold your breath until you pass the hardest part of the lift
The ascent should mirror your descent in terms of control and alignment. Avoid the temptation to shoot your hips up faster than your chest, which shifts the load to your lower back instead of your legs.
Pro Tip: Imagine pushing the floor away from you rather than pushing yourself up. This mental cue helps you engage your legs and glutes more effectively while maintaining proper form throughout the movement.
Common Mistakes to Avoid
Even experienced lifters can fall into bad habits. Recognizing these common errors will help you maintain perfect form and prevent injury.
Knees Caving Inward
When your knees collapse toward each other during the squat, it places dangerous stress on your knee joints and reduces glute activation. This often happens due to weak hip abductors or improper cueing. Focus on actively pushing your knees outward throughout the entire movement, thinking about spreading the floor apart with your feet.
Lifting Your Heels
If your heels come off the ground, you're shifting weight forward onto your toes, which compromises balance and knee safety. This usually indicates tight calves or limited ankle mobility. Work on ankle flexibility and consciously press your heels down throughout the squat.
Rounding Your Lower Back
A rounded lower back, especially at the bottom of the squat, puts excessive pressure on your spinal discs. This often occurs when you descend beyond your mobility limits. Stop at a depth where you can maintain a neutral spine, and work on hip and ankle mobility separately.
Looking Down
Where your eyes go, your body follows. Looking down encourages your chest to collapse forward and your back to round. Keep your gaze neutral or slightly upward to maintain proper spinal alignment.
Rushing the Movement
Speed is the enemy of good form, especially when learning. Control both the descent and ascent, taking 2-3 seconds for each phase. This builds strength throughout the entire range of motion and reinforces proper patterns.
Neglecting Core Engagement
Squatting without proper core bracing leaves your spine vulnerable. Remember to breathe, brace, and maintain tension in your midsection throughout every repetition.
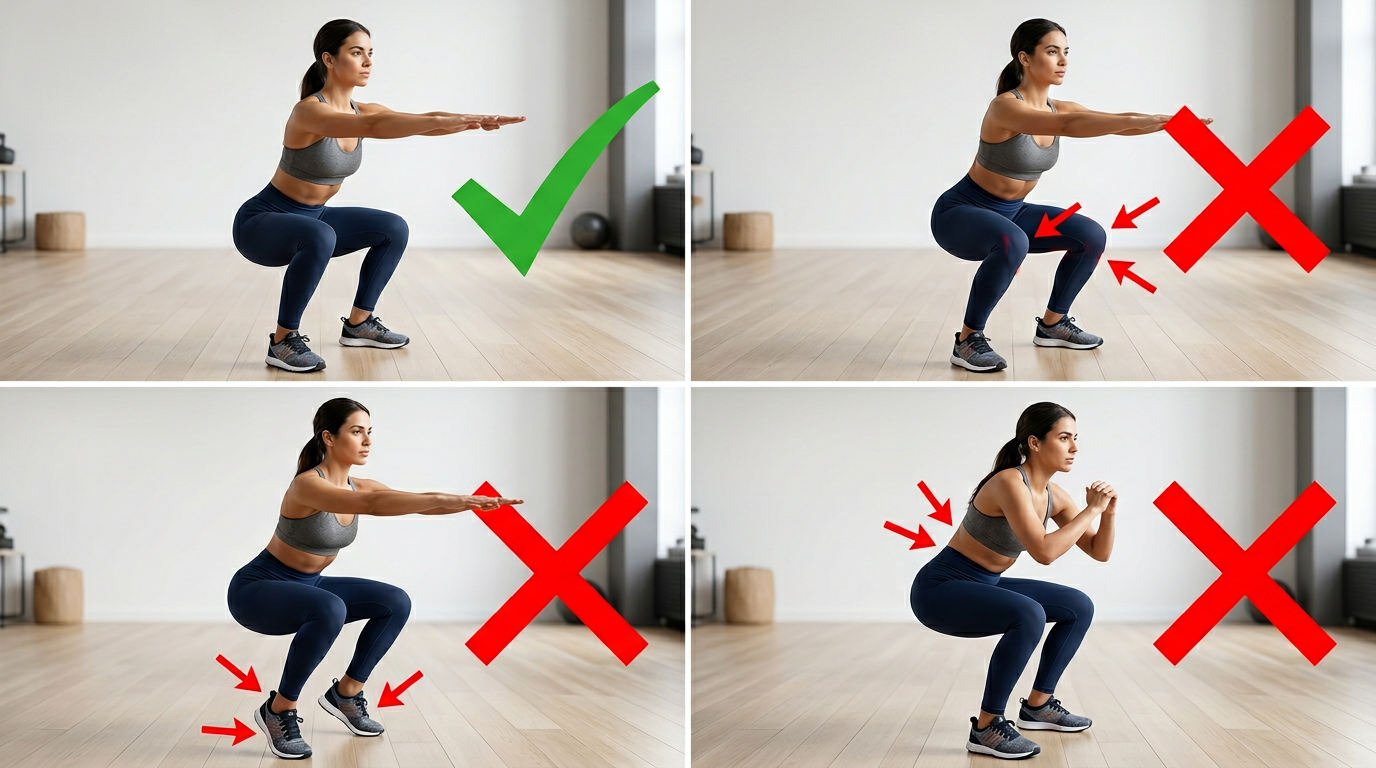
Split-screen comparison showing correct squat form versus common mistakes including knee valgus, heel lift, and back rounding with red X and green checkmark indicators
Troubleshooting Common Problems
Even with perfect instructions, you might encounter challenges. Here's how to address the most common issues women face when learning how to squat.
Problem: Can't Reach Parallel Without Losing Balance
Solution: This typically indicates limited ankle mobility or weak stabilizer muscles. Hold onto a sturdy post or doorframe while squatting to work on depth without falling backward. Practice goblet squats holding a light weight at chest level, which provides a counterbalance. Incorporate ankle mobility drills daily.
Problem: Knees Hurt During or After Squats
Solution: Knee pain often results from improper tracking or descending too quickly. Film yourself squatting from the front to check if your knees cave inward. Reduce your range of motion temporarily, focusing on perfect form in a pain-free range. Consider adding a resistance band around your thighs just above your knees to cue proper knee tracking.
Problem: Lower Back Feels Strained
Solution: Back strain usually means you're either rounding your spine or not engaging your core properly. Reduce your squat depth and focus on maintaining a neutral spine throughout. Strengthen your core with planks and dead bugs. Ensure you're initiating the movement with your hips, not your knees.
Problem: Can't Feel Glutes Working
Solution: If you feel squats primarily in your quads, you may not be sitting back far enough. Focus on the hip hinge pattern, pushing your hips back before bending your knees. Squeeze your glutes hard at the top of each rep. Try wider stance squats or add a glute activation warm-up before squatting.
Pro Tip: Perform 10-15 bodyweight squats as a warm-up before every workout, focusing purely on form rather than speed or intensity. This reinforces proper movement patterns and prepares your body for loaded squats.
Benefits Beyond Building Strength
While squats are renowned for building powerful legs and sculpted glutes, their benefits extend far beyond aesthetics and strength gains.
Improved Functional Fitness
Squats mimic natural movement patterns you use daily—sitting down, standing up, picking up objects from the floor. By strengthening these patterns, you make everyday activities easier and reduce injury risk during daily tasks.
Enhanced Circulation and Joint Health
The deep bending and straightening motion of squats promotes blood flow throughout your lower body. This increased circulation delivers nutrients to your muscles and joints while removing waste products. Regular squatting can improve hip mobility and reduce stiffness, particularly beneficial if you sit for long periods.
Core Stability and Posture
Proper squatting requires significant core engagement, which translates to better posture and reduced back pain in daily life. The core strength you build through squats supports your spine during all activities, from carrying groceries to playing with your children.
Bone Density and Long-Term Health
Weight-bearing exercises like squats stimulate bone growth and help maintain bone density, which is particularly important for women as we age. Starting a consistent squat practice now invests in your long-term mobility and independence.
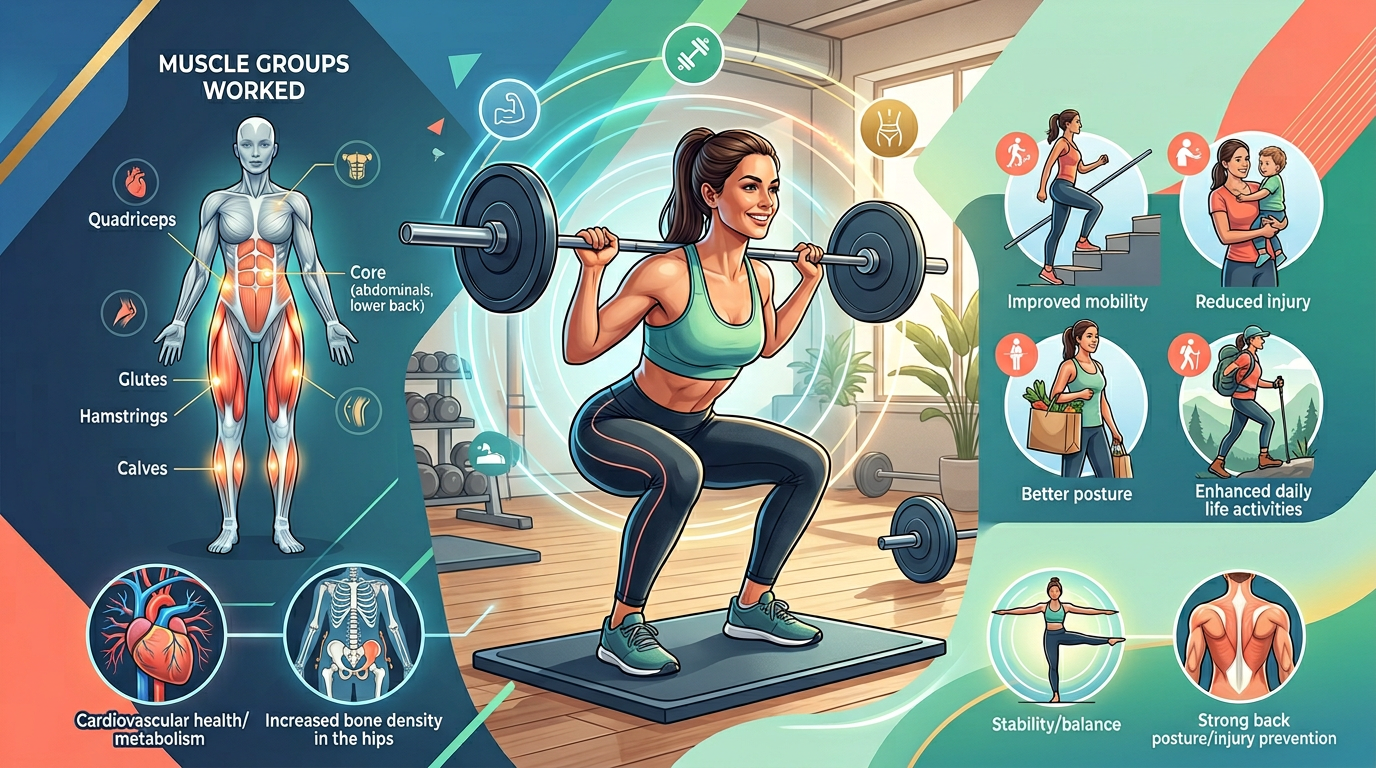
Infographic showing the multiple benefits of squats for women including muscle groups worked, functional benefits, and long-term health advantages
Progression and Variations
Once you've mastered the bodyweight squat, you can progress to more challenging variations to continue building strength and preventing plateaus.
Adding Resistance
Begin with goblet squats, holding a dumbbell or kettlebell at chest level. This variation is excellent for maintaining an upright torso and reinforcing proper form. Progress to holding dumbbells at your sides, then move to barbell squats when you're ready for heavier loads.
Tempo Variations
Slow down your squats to increase time under tension. Try a 3-1-3 tempo: three seconds down, one second pause at the bottom, three seconds up. This builds strength throughout the entire range of motion and improves muscle control.
Squat Variations for Different Goals
- Sumo squats: Wider stance with toes pointed out emphasizes inner thighs and glutes
- Bulgarian split squats: Single-leg variation that challenges balance and creates significant glute activation
- Pulse squats: Small movements at the bottom of the squat increase time under tension
- Jump squats: Plyometric variation that builds power and cardiovascular fitness
- Box squats: Squatting to a box or bench helps you learn proper depth and builds confidence
Creating Your Squat Routine
Consistency is key to seeing results from your squat practice. Here's how to incorporate squats into your training program effectively.
Frequency and Volume
For beginners, squat 2-3 times per week, allowing at least one rest day between sessions. Start with 3 sets of 8-12 repetitions, focusing on perfect form over high reps. As you build strength, you can increase to 4-5 sets or add weight while maintaining the same rep range.
Warm-Up Essentials
Never skip your warm-up. Spend 5-10 minutes preparing your body with dynamic stretches, leg swings, and bodyweight squats. This increases blood flow, improves range of motion, and reduces injury risk.
Progressive Overload
To continue seeing results, you must progressively challenge your muscles by increasing weight, reps, sets, or difficulty over time. Add 5-10 pounds when you can complete all sets with perfect form, or increase reps by 2-3 when using bodyweight.
Recovery Matters
Your muscles grow during rest, not during workouts. Ensure you're getting adequate protein, staying hydrated, and sleeping 7-9 hours nightly. If you're extremely sore, take an extra rest day—pushing through excessive soreness increases injury risk.
Frequently Asked Questions
How do you do a squat correctly?
Stand with feet shoulder-width apart, engage your core, and push your hips back while bending your knees. Lower until thighs are parallel to the floor, keeping knees aligned with toes and chest lifted. Drive through your heels to return to standing, squeezing your glutes at the top.
Can squatting help sciatica?
Squats can help sciatica by strengthening the muscles supporting your lower back and improving hip mobility, which may reduce nerve compression. However, if squatting causes sharp pain radiating down your leg, stop immediately and consult a healthcare provider before continuing.
Do squats help with blood flow?
Squats significantly improve blood flow by engaging large muscle groups in your legs and glutes, which pumps blood back to your heart. This enhanced circulation delivers oxygen and nutrients throughout your body while helping remove metabolic waste products from your muscles.
Can squats help with hip pain?
Squats can reduce hip pain by strengthening the muscles around your hip joint and improving mobility when performed with proper form. Start with shallow squats and gradually increase depth as strength improves. If pain persists or worsens, consult a physical therapist to address underlying issues.
How deep should women squat for glute activation?
Women should squat until the hip crease drops below the knee for maximum glute activation, typically deeper than parallel. This depth fully engages the glutes during the ascent. However, only descend as deep as you can while maintaining a neutral spine and proper knee alignment.
Should your knees go past your toes when squatting?
Your knees can safely travel slightly past your toes during squats, especially if you have longer femurs or good ankle mobility. The key is ensuring your knees track in line with your toes rather than caving inward, and keeping weight distributed through your entire foot.
How many squats should a beginner do daily?
Beginners should start with 3 sets of 8-12 bodyweight squats, 2-3 times per week rather than daily. Your muscles need rest days to recover and grow stronger. Focus on perfect form over high volume, gradually increasing reps or adding resistance as your strength improves.
What's Next: Taking Your Squat Practice Forward
Now that you understand how to squat with perfect form, the journey is just beginning. Start by practicing bodyweight squats daily, even if just for 5 minutes, to ingrain the movement pattern into your muscle memory. Film yourself from multiple angles to identify any form issues you might not feel.
As your confidence grows, challenge yourself with the variations and progressions outlined in this guide. Remember that building strength is a marathon, not a sprint—celebrate small improvements like increased depth, better balance, or the ability to add resistance. Perfect form today creates powerful results tomorrow, so prioritize quality over quantity in every single repetition.
Mastering how to squat correctly empowers you to build the strong, functional body you deserve while protecting your joints for years to come. Keep showing up, stay consistent with your practice, and trust the process as your strength and confidence grow with each workout.