Hip stretches are targeted movements that lengthen tight hip flexors, glutes, and surrounding muscles to improve mobility and reduce pain. The best hip stretches include pigeon pose, 90/90 stretch, butterfly stretch, and kneeling hip flexor stretch, each targeting different hip areas for comprehensive relief and flexibility.
Hip Stretches for Tight Hips: Best Moves to Ease Pain
If you've ever felt that nagging tightness in your hips after a workout, a long day at your desk, or even just getting out of bed, you're not alone. Tight hips affect countless women, limiting mobility, causing discomfort, and even impacting your strength training performance. Whether you're dealing with hip flexor tension from sitting, glute tightness from heavy squats, or general stiffness that makes movement uncomfortable, the right hip stretches can transform how you feel and move.
This comprehensive guide will walk you through the best hip stretches to ease pain, improve flexibility, and support your fitness goals. You'll discover which stretches target specific problem areas, how to perform them correctly, and how to integrate them into your routine for lasting results. Let's unlock those hips and help you move with confidence and freedom.
Key Takeaways
- Tight hips result from prolonged sitting, muscle imbalances, and intense training without adequate stretching
- The most effective hip stretches target hip flexors, glutes, and external rotators through multiple planes of motion
- Hold static stretches for 30-60 seconds and perform them after workouts or on rest days for best results
- Consistency matters more than intensity—gentle daily stretching outperforms aggressive occasional sessions
- Combining hip stretches with strength training creates balanced mobility and stability for injury prevention
Understanding Tight Hips and Why They Happen
Before diving into the best hip stretches, it's important to understand what causes hip tightness in the first place. Your hips are complex joints surrounded by multiple muscle groups that work together to support movement in all directions.
Common Causes of Hip Tightness
Prolonged sitting is the primary culprit behind tight hip flexors in modern life. When you sit for extended periods, your hip flexors remain in a shortened position, eventually adapting to this length and feeling tight when you stand or move. This affects not just office workers but anyone who spends significant time seated.
Intense lower body training without adequate stretching can also create tightness. Heavy squats, lunges, and deadlifts build incredible strength but can leave muscles feeling contracted and stiff. Additionally, muscle imbalances where certain hip muscles are stronger than others can pull your pelvis out of alignment, creating tension and discomfort.
Signs Your Hips Need Attention
How do you know if your hips are truly tight? Common signs include difficulty touching your toes, discomfort when sitting cross-legged, lower back pain that worsens with activity, reduced range of motion during squats or lunges, and a pinching sensation in the front of your hip during leg raises.
You might also notice your glutes aren't activating properly during exercises, or you feel an asymmetry where one hip feels tighter than the other. These are all indicators that targeted hip stretches should become a priority in your routine.
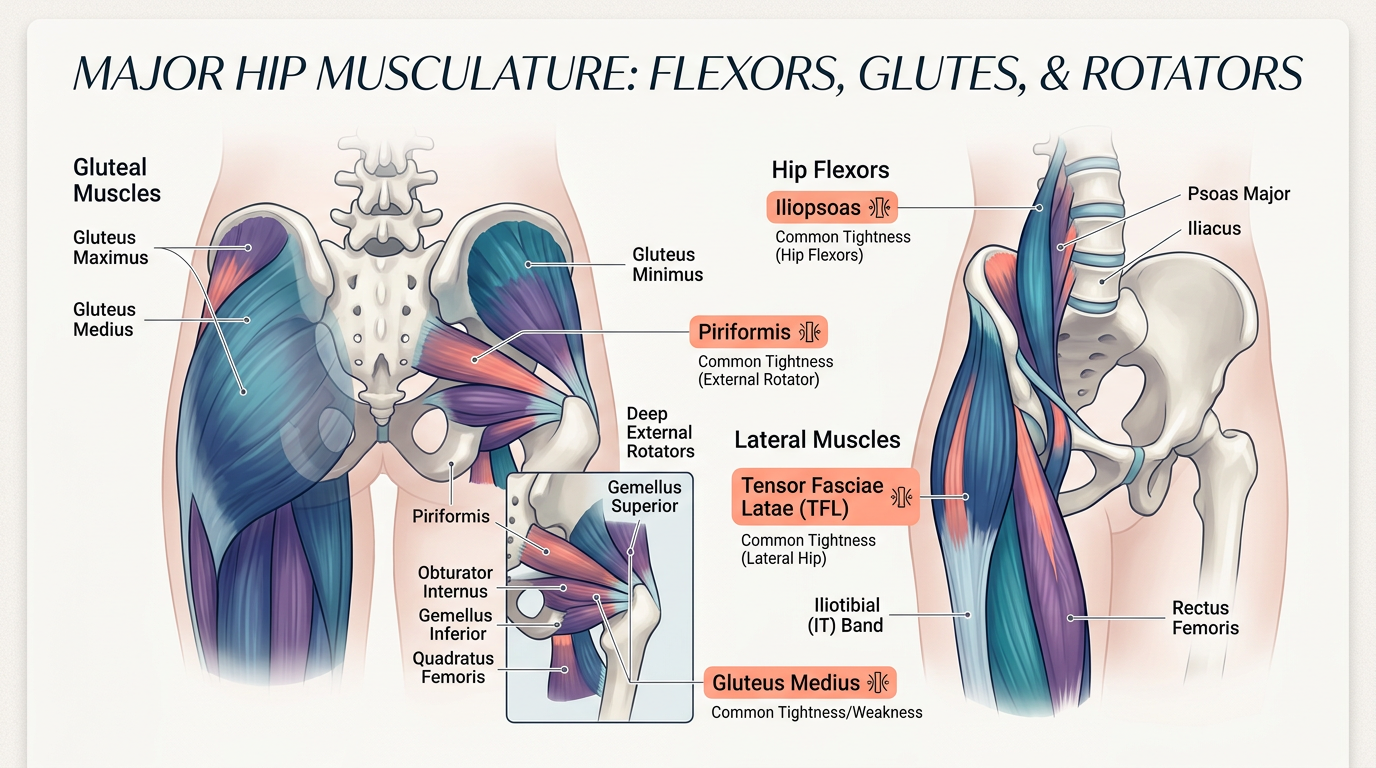
Anatomical illustration showing the major hip muscles including hip flexors, glutes, and external rotators with labels highlighting common tight areas
How to Get the Most from Your Hip Stretches
To maximize the benefits of your hip stretching routine, follow these evidence-based principles that will help you see faster improvements while avoiding common mistakes.
Timing and Frequency
The best time for static hip stretches is after your workouts when muscles are warm and pliable, or on rest days as part of an active recovery routine. Aim to stretch your hips at least 3-4 times per week, though daily stretching provides even better results for those dealing with significant tightness.
Hold each stretch for 30-60 seconds to allow the muscle fibers to relax and lengthen. Shorter holds won't provide the same benefits, while excessively long holds beyond 90 seconds show diminishing returns for most people.
Proper Technique Essentials
Quality always trumps intensity when it comes to stretching. You should feel a gentle pull or tension in the target muscle, never sharp pain. Breathe deeply and consistently throughout each stretch—holding your breath increases muscle tension and reduces effectiveness.
Focus on relaxing into each position rather than forcing your body deeper. Progressive stretching over weeks yields better results than aggressive stretching that risks injury. Pay attention to alignment cues for each stretch to ensure you're targeting the intended muscles.
Stretching Guidelines for Best Results
- Always warm up with 5-10 minutes of light movement before stretching cold muscles
- Stretch both sides equally even if one hip feels tighter than the other
- Combine different stretches to address all hip muscle groups comprehensively
- Use props like yoga blocks, pillows, or resistance bands to modify stretches as needed
- Track your progress by noting improvements in range of motion and comfort levels
- Be patient—meaningful flexibility improvements typically take 4-6 weeks of consistent practice
Comparison Table: Best Hip Stretches at a Glance
Stretch Name
Primary Target
Difficulty Level
Best For
Pigeon Pose
Glutes, External Rotators
Intermediate
Deep hip opening
90/90 Stretch
Internal/External Rotators
Intermediate
Rotational mobility
Kneeling Hip Flexor Stretch
Hip Flexors, Psoas
Beginner
Desk workers
Butterfly Stretch
Inner Thighs, Adductors
Beginner
Groin tightness
Figure-4 Stretch
Glutes, Piriformis
Beginner
Lower back relief
Frog Stretch
Adductors, Inner Hips
Intermediate
Deep inner hip opening
Lizard Pose
Hip Flexors, Quads
Intermediate
Front hip tightness
Happy Baby Pose
Inner Thighs, Lower Back
Beginner
Gentle decompression
Standing Figure-4
Glutes, Balance
Beginner
Quick relief anywhere
Supine Spinal Twist
Outer Hips, Lower Back
Beginner
Post-workout recovery
1. Pigeon Pose
Pigeon pose is widely considered one of the most effective hip stretches for targeting the glutes and external hip rotators. This yoga-inspired stretch provides a deep opening that addresses tightness many women experience from sitting and strength training.
To perform pigeon pose, start in a tabletop position on your hands and knees, then bring your right knee forward toward your right wrist while extending your left leg straight behind you. Your right shin should angle across your mat with your right foot near your left hip. Square your hips toward the front of the mat and slowly lower your torso down, resting on your forearms or extending your arms fully forward.
The beauty of pigeon pose lies in its adjustability. If you feel too much intensity, place a yoga block or folded towel under your right hip for support. As your flexibility improves over weeks of practice, you can gradually work toward a deeper fold. Focus on keeping your back leg straight and your hips level rather than allowing one side to dip.
Hold this position for 45-60 seconds on each side, breathing deeply to encourage relaxation. You should feel the stretch primarily in your right glute and outer hip. If you experience knee discomfort, adjust the angle of your front shin or try the figure-4 stretch instead.
Pros
- Provides deep stretch for glutes and external rotators that's hard to achieve with other movements
- Highly adjustable for different flexibility levels using props and modifications
- Addresses multiple hip muscles simultaneously for efficient stretching
- Can help relieve sciatic nerve tension and lower back discomfort
Cons
- Can be challenging for beginners with very tight hips
- May cause knee discomfort if alignment isn't correct
- Requires floor space and isn't practical for quick stretching breaks
2. 90/90 Stretch
The 90/90 stretch is a powerful hip mobility exercise that simultaneously addresses both internal and external hip rotation. This stretch is particularly valuable for women who do heavy lower body training, as it targets rotational mobility that often gets neglected.
Sit on the floor with your right leg in front of you, bent at 90 degrees with your knee pointing forward and your foot pointing left. Position your left leg behind you, also bent at 90 degrees with your knee pointing left and your foot pointing backward. Both knees and both ankles should form right angles. Sit tall with your spine straight, then gently lean forward over your front leg to deepen the stretch.
The 90/90 position challenges your hip mobility in a unique way by placing one hip in external rotation and the other in internal rotation simultaneously. This bilateral approach helps identify and address asymmetries between your left and right hips. You'll likely notice one side feels significantly tighter than the other—this is completely normal and highlights areas that need extra attention.
To progress this stretch, try lifting your back knee slightly off the ground or rotating your torso toward your front leg. Hold for 45-60 seconds, then switch sides. Consistency with this stretch can dramatically improve your squat depth and hip comfort during lower body exercises.
Pros
- Targets both internal and external hip rotation in one efficient movement
- Excellent for identifying and correcting left-right hip mobility imbalances
- Directly improves squat depth and lower body exercise performance
- Can be performed with various torso positions to emphasize different areas
Cons
- Requires significant baseline mobility to get into the starting position
- Can feel awkward or uncomfortable initially for those with very tight hips
- Not suitable for those with knee issues or recent knee injuries
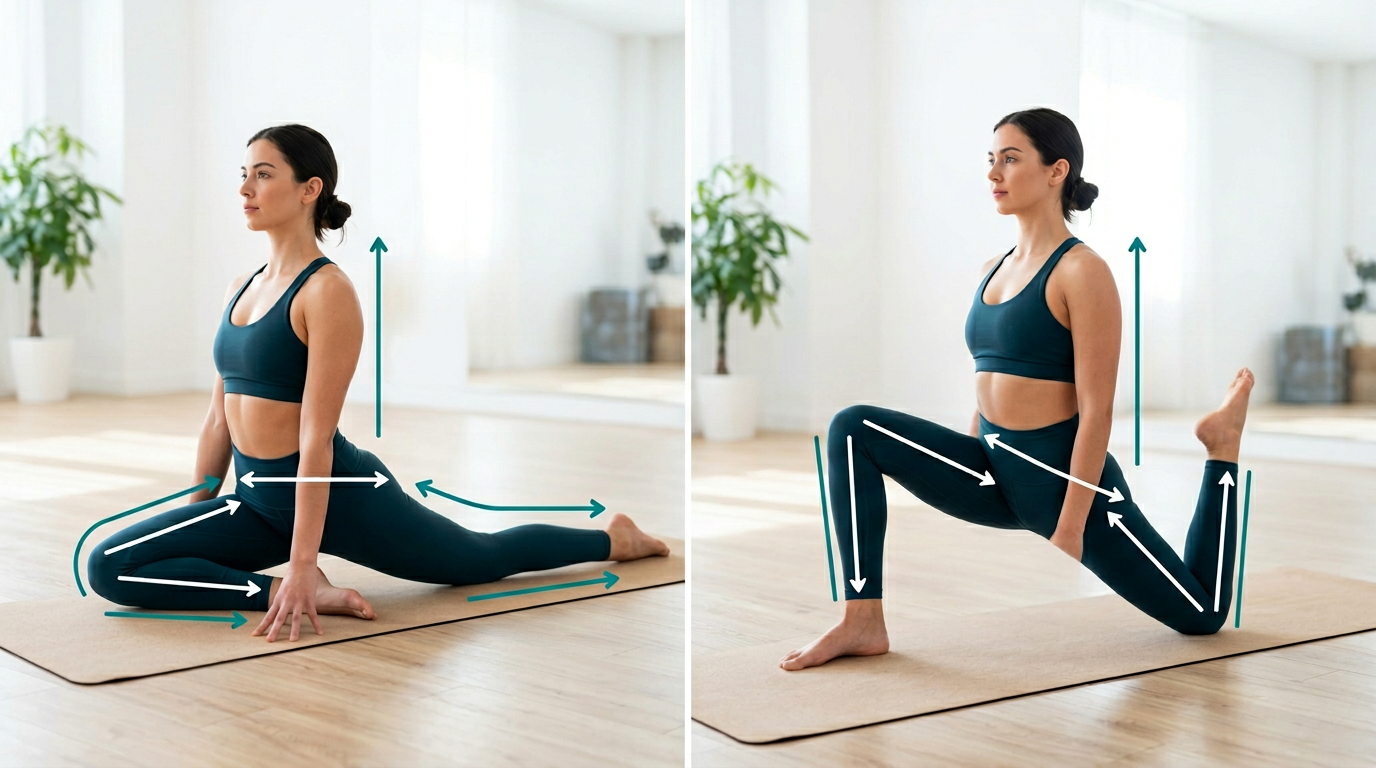
Side-by-side demonstration photos showing proper form for pigeon pose and 90/90 stretch with alignment cues highlighted
3. Kneeling Hip Flexor Stretch
The kneeling hip flexor stretch directly addresses the most common source of hip tightness: shortened hip flexors from prolonged sitting. This stretch is essential for anyone who spends significant time at a desk or experiences anterior hip discomfort.
Begin in a half-kneeling position with your right foot flat on the floor in front of you and your left knee on the ground behind you, creating a 90-degree angle with both legs. Place your hands on your right thigh for support, engage your core, and gently tuck your pelvis under (posterior pelvic tilt). Keeping your torso upright, shift your weight forward until you feel a stretch in the front of your left hip and thigh.
The key to maximizing this stretch is the pelvic tilt—simply lunging forward without tucking your pelvis won't effectively target the hip flexors. Think about bringing your pubic bone toward your belly button as you shift forward. You can intensify the stretch by raising your left arm overhead and gently side-bending to the right.
Hold for 45-60 seconds on each side, focusing on maintaining an upright torso rather than leaning forward. Use a folded towel or mat under your back knee for comfort. This stretch is perfect to perform between sets of lower body exercises or as part of your evening routine to counteract daytime sitting.
Pros
- Directly targets hip flexors, the most commonly tight hip muscle group
- Simple to learn and appropriate for all fitness levels
- Can be performed almost anywhere with minimal space
- Immediately improves hip extension range of motion for better glute activation
Cons
- Requires padding under the back knee for comfort on hard surfaces
- May be challenging for those with knee or ankle mobility limitations
- Easy to perform incorrectly without the proper pelvic tilt cue
4. Butterfly Stretch
The butterfly stretch is a classic flexibility exercise that targets the inner thighs and hip adductors. This gentle stretch is perfect for beginners and provides a comfortable way to open the hips without requiring significant flexibility.
Sit on the floor with your knees bent and the soles of your feet pressed together, allowing your knees to fall out to the sides. Hold your feet or ankles with your hands and sit tall with a straight spine. Gently press your elbows against your inner thighs or knees to encourage them toward the floor, creating a deeper stretch. Alternatively, hinge forward at your hips while maintaining a neutral spine to intensify the sensation.
The butterfly stretch is particularly beneficial for women who experience inner thigh tightness from activities like running, cycling, or heavy squatting. It also helps improve hip abduction range of motion, which supports proper squat mechanics and reduces knee valgus (knees caving inward) during lower body exercises.
For a more active variation, gently pulse your knees toward the floor in small, controlled movements—this dynamic approach can help improve mobility more quickly than static stretching alone. Hold the static stretch for 45-60 seconds, breathing deeply and relaxing further with each exhale.
Pros
- Extremely beginner-friendly with minimal injury risk
- Effectively stretches inner thighs and hip adductors
- Can be performed while watching TV or during other activities
- Easily modified by adjusting foot distance from the body
Cons
- Provides limited stretch for hip flexors and external rotators
- May feel too gentle for those with good existing flexibility
- Can put pressure on knees if forced too aggressively
5. Figure-4 Stretch
The figure-4 stretch, also called the supine piriformis stretch, is an excellent option for targeting the glutes and piriformis muscle. This stretch is particularly effective for relieving lower back tension and addressing sciatic nerve discomfort.
Lie on your back with both knees bent and feet flat on the floor, then cross your right ankle over your left thigh just above the knee, creating a figure-4 shape with your legs. Reach your hands behind your left thigh or through the gap between your legs to grasp your left shin, then gently pull your left leg toward your chest. Keep your head and shoulders relaxed on the floor and your right knee pressing gently away from your body.
This stretch is wonderfully versatile because it can be performed lying down, making it ideal for post-workout recovery or as part of a bedtime routine. The supine position also allows gravity to assist the stretch, making it more accessible than seated variations. You should feel the stretch primarily in your right glute and outer hip.
For a deeper stretch, flex your right foot and actively press your right knee away from your body. If you struggle to reach your shin, use a resistance band or towel looped behind your thigh. Hold for 45-60 seconds on each side, focusing on relaxing completely into the position.
Pros
- Can be performed lying down, making it perfect for recovery and relaxation
- Effectively targets glutes and piriformis to relieve lower back tension
- Gentle on the knees compared to other hip stretches
- Easy to modify intensity by adjusting how close you pull your leg
Cons
- Requires lying on the floor, which isn't always practical
- May not provide enough stretch for those with very flexible hips
- Limited carryover to rotational hip mobility
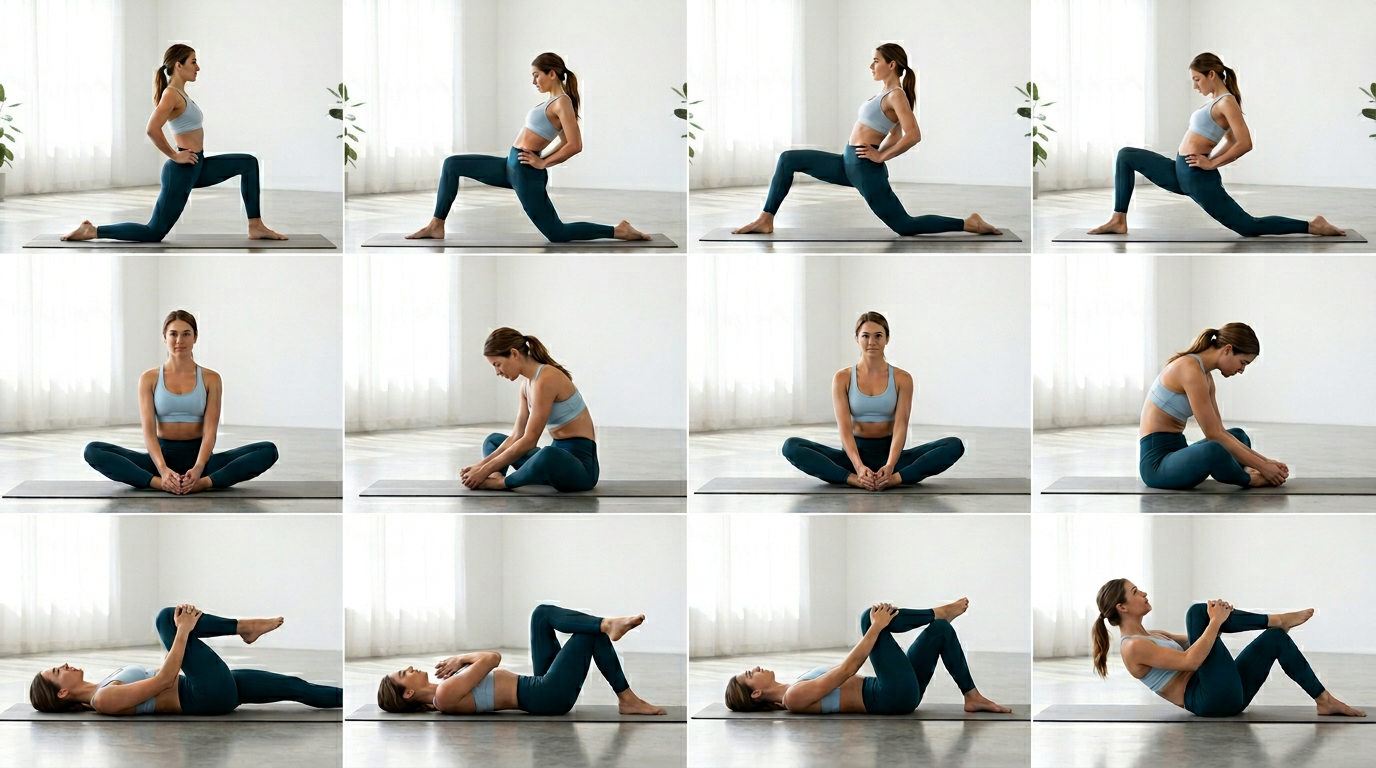
Step-by-step photo sequence showing kneeling hip flexor stretch, butterfly stretch, and figure-4 stretch with proper form and common mistakes highlighted
6. Frog Stretch
The frog stretch is an intense hip opener that targets the inner thighs and adductors from a different angle than the butterfly stretch. This stretch is particularly valuable for improving hip abduction mobility and addressing deep inner hip tightness.
Start on your hands and knees, then gradually slide your knees apart as wide as comfortable while keeping your ankles in line with your knees and your feet turned outward. Lower down to your forearms if possible, allowing your hips to sink toward the floor. Your inner thighs should feel a significant stretch, but avoid forcing the position beyond a moderate intensity.
The frog stretch can feel quite intense, especially if you have tight adductors, so approach it gradually. Use a folded mat or towel under your knees for cushioning, and consider placing a pillow under your hips if you need to reduce the intensity. You can make small rocking movements forward and backward to explore different angles and find areas of particular tightness.
Hold this position for 45-60 seconds, breathing deeply and allowing your hips to gradually sink lower as your muscles relax. This stretch is best performed after your muscles are thoroughly warmed up, never as the first stretch in your routine. Consistency with the frog stretch can significantly improve your squat width and comfort in wide-stance lower body exercises.
Pros
- Provides deep stretch for inner thighs and hip adductors
- Improves hip abduction range of motion for better squat mechanics
- Allows for dynamic exploration of tight areas through gentle rocking
- Can dramatically improve comfort in wide-stance exercises
Cons
- Can be very intense for beginners or those with tight hips
- Puts pressure on knees and requires adequate padding
- Not suitable for those with groin injuries or knee problems
7. Lizard Pose
Lizard pose is a dynamic hip stretch that targets the hip flexors, quads, and groin simultaneously. This deep lunge variation provides an excellent stretch for the front of the hip while also challenging your balance and core stability.
From a plank position, step your right foot to the outside of your right hand, positioning your foot slightly wider than your shoulder. Lower your back knee to the ground if desired, then sink your hips forward and down while keeping your front heel grounded. You can stay on your hands or lower to your forearms for a deeper stretch. Your right knee should track over your right ankle, not collapsing inward.
Lizard pose offers multiple variation options to target different aspects of hip mobility. You can keep your back leg straight for a more intense hip flexor stretch, or lower the back knee for a gentler version. Rocking gently forward and backward helps you find the optimal stretch position. For an additional challenge, lift your back knee off the ground to engage your core and hip stabilizers.
Hold for 45-60 seconds on each side, maintaining steady breathing throughout. This stretch pairs beautifully with pigeon pose in a comprehensive hip-opening sequence. Focus on keeping your chest lifted and your front knee stable rather than allowing it to cave inward.
Pros
- Targets multiple hip areas including flexors, quads, and groin simultaneously
- Offers numerous variations to adjust intensity and target different muscles
- Builds hip stability and balance alongside flexibility
- Excellent preparation for deep squat positions
Cons
- Requires good baseline flexibility and balance to perform correctly
- Can be challenging to maintain proper knee alignment
- May feel too intense for beginners with very tight hips
8. Happy Baby Pose
Happy baby pose is a gentle, accessible hip stretch that also provides spinal decompression and lower back relief. This playful stretch is perfect for winding down after workouts or as part of an evening relaxation routine.
Lie on your back and draw both knees toward your chest, then open your knees slightly wider than your torso and bring them toward your armpits. Reach up and grasp the outside edges of your feet, your big toes, or the backs of your thighs if you can't reach your feet. Gently pull your knees toward the floor on either side of your body while pressing your feet up into your hands. Keep your lower back pressed into the floor and your tailbone heavy.
This stretch provides a gentle opening for the inner hips and groin while simultaneously releasing tension in the lower back and sacrum. The supine position makes it incredibly relaxing and accessible for all fitness levels. You can gently rock side to side to massage your lower back, or hold the position statically for a deeper stretch.
Hold for 60-90 seconds, breathing deeply into your belly. If you can't reach your feet comfortably, loop a resistance band or towel around each foot to extend your reach. This stretch is particularly soothing after heavy lower body training days or when your hips feel compressed from sitting.
Pros
- Extremely gentle and accessible for all fitness levels
- Provides both hip opening and spinal decompression simultaneously
- Very relaxing and perfect for stress relief and recovery
- Easy to modify with props for limited flexibility
Cons
- Provides less intense stretch than other options
- Requires lying on the floor with space to extend legs
- May not adequately address severe hip flexor tightness
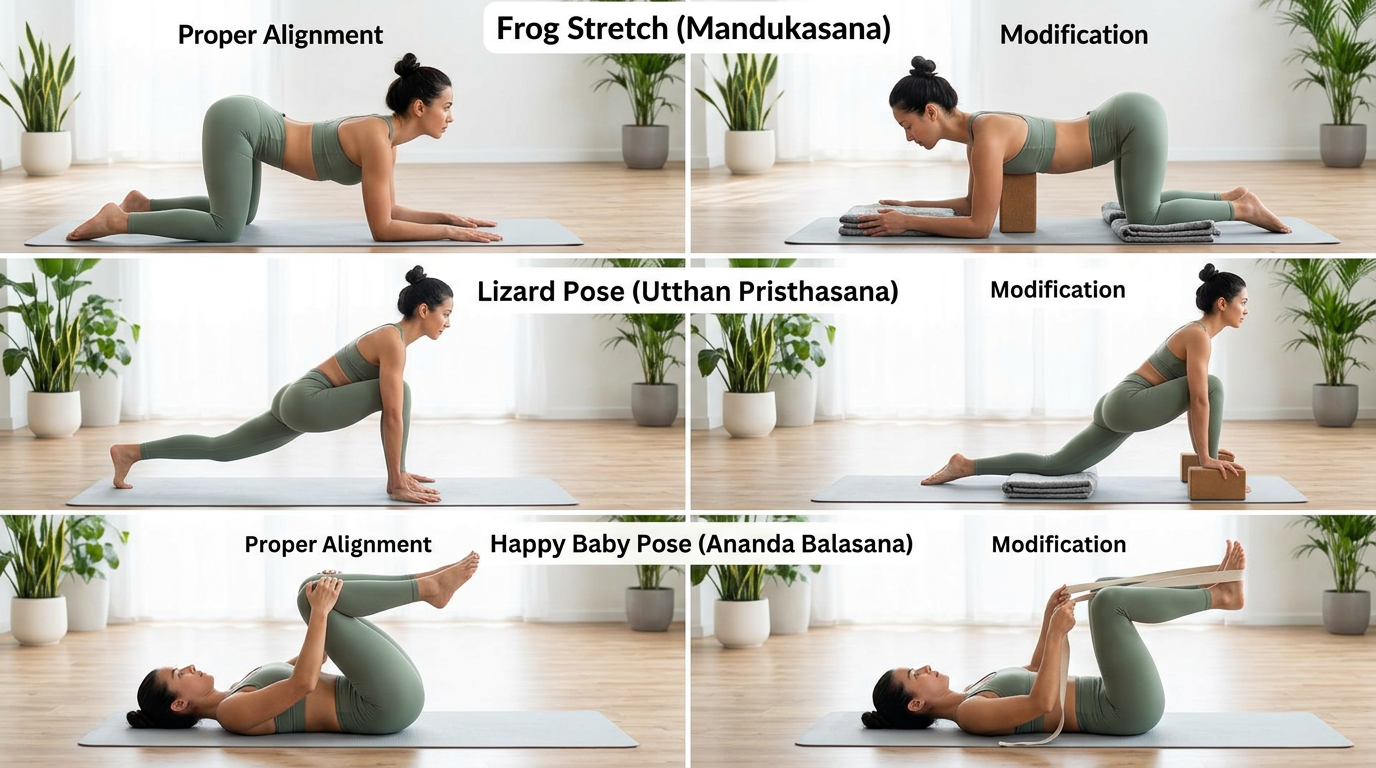
Demonstration photos of frog stretch, lizard pose, and happy baby pose showing proper alignment and common modifications
9. Standing Figure-4
The standing figure-4 is a convenient variation of the supine figure-4 stretch that can be performed anywhere without needing to lie down. This makes it perfect for quick stretching breaks at work, between training sets, or whenever your hips need relief.
Stand on your left leg and cross your right ankle over your left thigh just above the knee, creating a figure-4 shape. Bend your standing leg and sit back into a single-leg squat position while keeping your chest lifted and your spine neutral. Push your right knee gently away from your body to deepen the stretch in your right glute and outer hip. Use a wall or chair for balance support if needed.
This stretch offers the added benefit of building single-leg balance and stability while opening your hips. It's particularly useful for identifying strength and mobility imbalances between sides. You'll likely notice one leg is significantly more challenging than the other—this awareness helps you address weaknesses that could lead to injury.
Hold for 30-45 seconds on each side, focusing on maintaining balance and proper alignment. To increase intensity, sit back deeper into your standing leg or press your raised knee more firmly away from your body. This stretch is excellent to perform between sets of squats or lunges to maintain hip mobility throughout your workout.
Pros
- Can be performed anywhere without lying down or special equipment
- Builds balance and single-leg stability alongside flexibility
- Perfect for quick stretching breaks throughout the day
- Helps identify and address left-right imbalances
Cons
- Requires good balance and may be challenging initially
- Provides less intense stretch than the supine variation
- Not ideal for those with balance issues or ankle instability
10. Supine Spinal Twist
The supine spinal twist is a relaxing stretch that targets the outer hips, IT band, and lower back while providing a gentle spinal rotation. This stretch is particularly effective for releasing tension accumulated during lower body training and improving rotational mobility.
Lie on your back with your arms extended out to the sides in a T-position, then bend your right knee and draw it toward your chest. Using your left hand, gently guide your right knee across your body toward the left side, allowing it to lower toward the floor while keeping your right shoulder blade on the ground. Turn your head to the right to complete the twist. Your body should form a spiral from your shoulders through your hips to your knees.
This stretch provides a wonderful release for the entire lateral hip and lower back chain. The twisting motion helps decompress the spine while the crossed-leg position stretches the outer hip and IT band. You can adjust the intensity by bringing your knee higher or lower relative to your waist—bringing it higher emphasizes the lower back, while positioning it lower targets the outer hip more directly.
Hold for 60-90 seconds on each side, breathing deeply and allowing gravity to gently pull your knee toward the floor. Avoid forcing your knee down if your shoulder lifts off the ground—maintain the shoulder contact and let the stretch develop gradually over time. This stretch is perfect for ending your workout or as part of a bedtime routine.
Pros
- Stretches outer hips, IT band, and lower back simultaneously
- Provides spinal decompression and rotational mobility
- Extremely relaxing and perfect for recovery and stress relief
- Gentle enough to perform daily without risk of overstretching
Cons
- Requires lying on the floor with adequate space
- Provides less direct hip flexor stretch than other options
- May not be suitable for those with certain spinal conditions
Creating Your Hip Stretching Routine
Now that you understand the best hip stretches, it's time to combine them into an effective routine that fits your schedule and addresses your specific needs.
Sample Hip Stretching Sequences
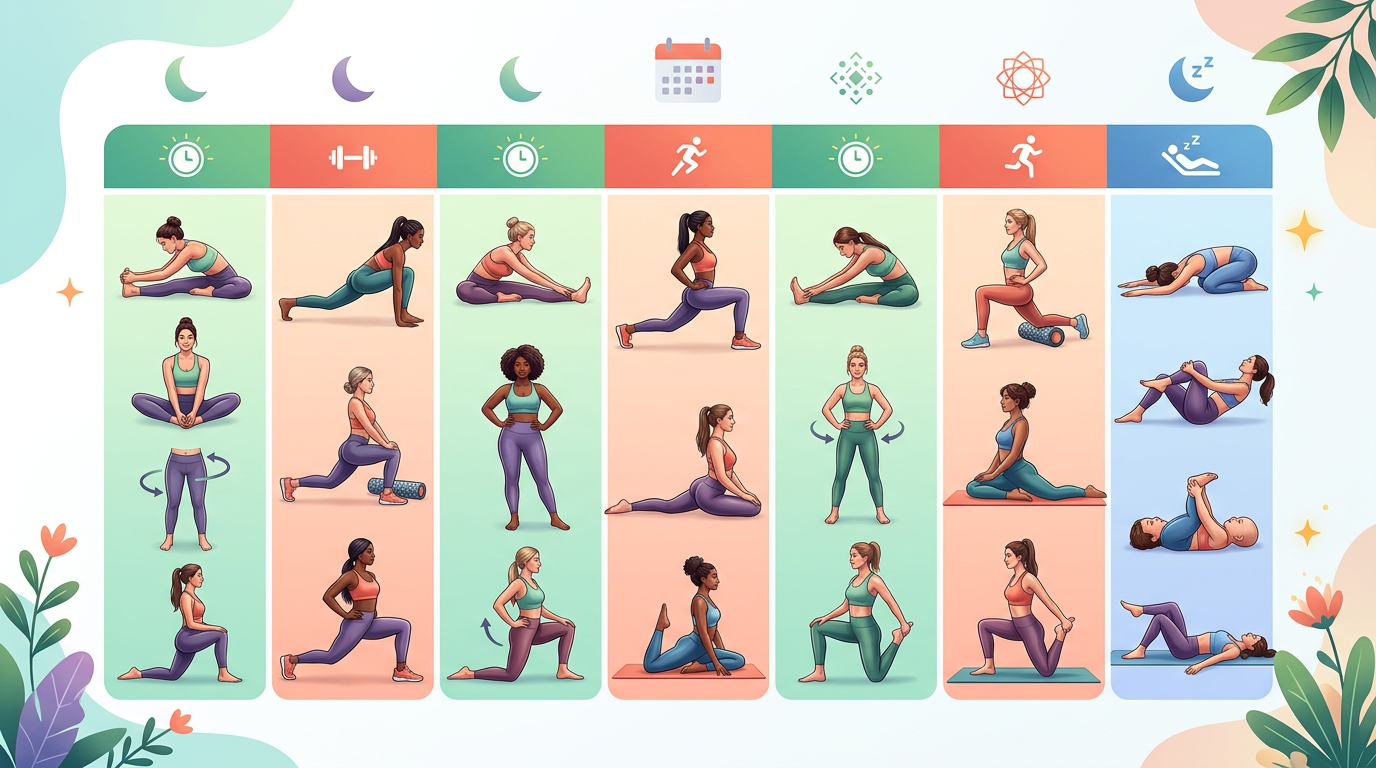
For a comprehensive 15-minute hip opening routine, perform these stretches in sequence: kneeling hip flexor stretch (60 seconds each side), butterfly stretch (60 seconds), 90/90 stretch (60 seconds each side), pigeon pose (60 seconds each side), and supine spinal twist (60 seconds each side). This combination addresses all major hip muscle groups and movement planes.
If you only have 5 minutes, prioritize the stretches that target your tightest areas. Most women benefit from focusing on the kneeling hip flexor stretch, figure-4 stretch, and butterfly stretch as a quick daily routine. These three movements address the most common problem areas efficiently.
When to Stretch Throughout Your Week
- After lower body workouts: Perform 10-15 minutes of hip stretches while muscles are warm
- On rest days: Dedicate 20-30 minutes to a thorough hip mobility session
- Before bed: Use gentle stretches like happy baby and supine spinal twist for relaxation
- During work breaks: Perform standing figure-4 and kneeling hip flexor stretches between sitting periods
- Before upper body workouts: Include 5 minutes of hip stretches to maintain mobility even on non-leg days
Progressive Overload for Flexibility
Just like strength training, flexibility improves through progressive overload. Start with the gentler variations and shorter hold times, then gradually increase intensity and duration as your mobility improves. Track your progress by noting how deep you can comfortably move into each stretch and how quickly you feel the release.
Every 2-3 weeks, reassess your hip mobility and adjust your routine accordingly. You might find certain stretches become easier and need to be replaced with more challenging variations, while other areas continue to need consistent attention.
Infographic showing a sample weekly hip stretching schedule with different routines for post-workout, rest days, and daily maintenance
Which Hip Stretch Is Best For You?
Choosing the right hip stretches depends on your specific tightness patterns, fitness level, and lifestyle factors. Here's how to match stretches to your needs.
If You're a Desk Worker with Hip Flexor Tightness
Focus primarily on the kneeling hip flexor stretch and lizard pose, as these directly address shortened hip flexors from prolonged sitting. Perform the standing figure-4 during work breaks to maintain mobility throughout the day. Add the supine spinal twist before bed to release accumulated tension.
If You're a Strength Trainer with Tight Glutes
Prioritize pigeon pose, figure-4 stretch, and 90/90 stretch to address glute and external rotator tightness from heavy squats and deadlifts. These stretches will help maintain your squat depth and reduce lower back compensation. Include the frog stretch on rest days for comprehensive hip opening.
If You're a Beginner with Limited Flexibility
Start with the butterfly stretch, figure-4 stretch, and happy baby pose—these are the most accessible options that provide meaningful benefits without requiring significant baseline flexibility. Use props liberally to modify positions, and focus on consistency over intensity. Gradually add the kneeling hip flexor stretch and standing figure-4 as your mobility improves.
If You Have Lower Back Pain Related to Hip Tightness
Emphasize the figure-4 stretch, happy baby pose, and supine spinal twist, as these provide both hip opening and lower back relief. The kneeling hip flexor stretch is also crucial, since tight hip flexors often contribute to anterior pelvic tilt and lower back strain. Perform these stretches daily for best results.
If You Want Maximum Hip Mobility for Athletic Performance
Incorporate all ten stretches into a comprehensive rotation throughout the week, with particular emphasis on the 90/90 stretch, lizard pose, and frog stretch for their rotational and multi-planar mobility benefits. These stretches will improve your movement quality in sports and complex exercises.
Frequently Asked Questions
How do you loosen tight hips?
Loosen tight hips through consistent static stretching for 30-60 seconds per stretch, targeting hip flexors, glutes, and adductors. Perform hip stretches after workouts when muscles are warm, or on rest days as active recovery. Combine stretching with foam rolling and gentle movement to improve blood flow and accelerate mobility gains.
What are signs of tight hip flexors?
Signs of tight hip flexors include lower back pain that worsens with standing, difficulty standing fully upright after sitting, anterior hip pinching during leg raises, and reduced glute activation during exercises. You may also notice an anterior pelvic tilt where your lower back arches excessively and your pelvis tilts forward.
How do you decompress your hips?
Decompress your hips using supine stretches like happy baby pose and figure-4 stretch that allow gravity to gently open the joint. Perform gentle hip circles and controlled articulations to increase synovial fluid production. Combine stretching with deep breathing to promote muscle relaxation and reduce compression from muscular tension.
What is the #1 exercise for your hips?
The 90/90 stretch is the most comprehensive single exercise for hip mobility because it simultaneously addresses internal rotation, external rotation, and flexion in both hips. This stretch identifies imbalances between sides and improves rotational mobility that directly enhances squat depth and lower body exercise performance.
How long should you hold hip stretches?
Hold hip stretches for 30-60 seconds per side to allow muscle fibers adequate time to relax and lengthen. Research shows holds shorter than 30 seconds provide minimal flexibility benefits, while holds beyond 90 seconds offer diminishing returns. Focus on consistent breathing and gradual deepening rather than forcing intensity.
Can tight hips cause knee pain?
Tight hips can cause knee pain by altering lower body mechanics and forcing the knee joint to compensate for limited hip mobility. Restricted hip internal rotation often leads to knee valgus during squatting movements, increasing stress on knee ligaments. Improving hip flexibility through targeted stretches often reduces knee discomfort significantly.
Should you stretch your hips every day?
Daily hip stretching is beneficial and safe for most women, particularly those with sedentary jobs or intense training schedules. Perform gentle to moderate intensity stretches daily, reserving more aggressive stretching for post-workout sessions when muscles are warm. Listen to your body and reduce frequency if you experience persistent soreness or discomfort.
Conclusion
Tight hips don't have to limit your movement, compromise your workouts, or cause daily discomfort. By incorporating these ten effective hip stretches into your routine consistently, you'll experience improved mobility, reduced pain, and better performance in all your activities. Remember that flexibility develops gradually through patient, consistent practice—start with the stretches that address your tightest areas, hold each position for 30-60 seconds, and perform your routine at least 3-4 times weekly for best results.
The most effective hip stretches target multiple muscle groups including hip flexors, glutes, adductors, and external rotators through various planes of motion. Whether you're dealing with hip flexor tightness from desk work, glute tightness from strength training, or general stiffness that impacts your quality of life, these evidence-based stretches will help you move with greater freedom and confidence. Your hips support nearly every movement you make—investing time in their mobility pays dividends in how you feel and perform every single day.