Glute Bridge vs Hip Thrust: Which Builds Better Results
Glute bridge vs hip thrust are both effective exercises for building stronger, more developed glutes. Hip thrusts offer greater range of motion and loading capacity for maximum strength gains, while glute bridges provide excellent muscle activation with minimal equipment, making them ideal for beginners and home workouts.
If you've ever wondered which exercise will give you the best results for building stronger, rounder glutes, you're not alone. The glute bridge vs hip thrust debate is one of the most common questions in women's strength training. Both exercises target your glutes effectively, but they differ in execution, equipment needs, and the specific benefits they deliver.
Understanding these differences is crucial for designing a workout program that aligns with your fitness level, goals, and available equipment. Whether you're just starting your strength training journey or you're ready to level up your glute development, this comprehensive guide will help you make an informed decision about which exercise deserves a place in your routine.
We'll break down everything you need to know about these two powerhouse movements, from proper form and muscle activation to progression strategies and common mistakes. By the end, you'll have a clear understanding of how to use both exercises to build the strong, functional glutes you're working toward.
Key Takeaways
- Hip thrusts allow heavier loading and greater range of motion, making them superior for maximum strength development
- Glute bridges are more accessible for beginners and require minimal equipment, perfect for home workouts
- Both exercises effectively activate the glutes, with hip thrusts showing slightly higher activation in research studies
- Proper form is essential for both movements to prevent lower back compensation and maximize glute engagement
- Combining both exercises in your program provides comprehensive glute development at different angles and intensities
Understanding the Glute Bridge vs Hip Thrust Fundamentals
Before diving into the comparison, let's establish what each exercise actually involves. Both movements are hip extension exercises that primarily target your gluteus maximus, the largest muscle in your body. They also engage your hamstrings, core, and lower back stabilizers to varying degrees.
What Is a Glute Bridge?
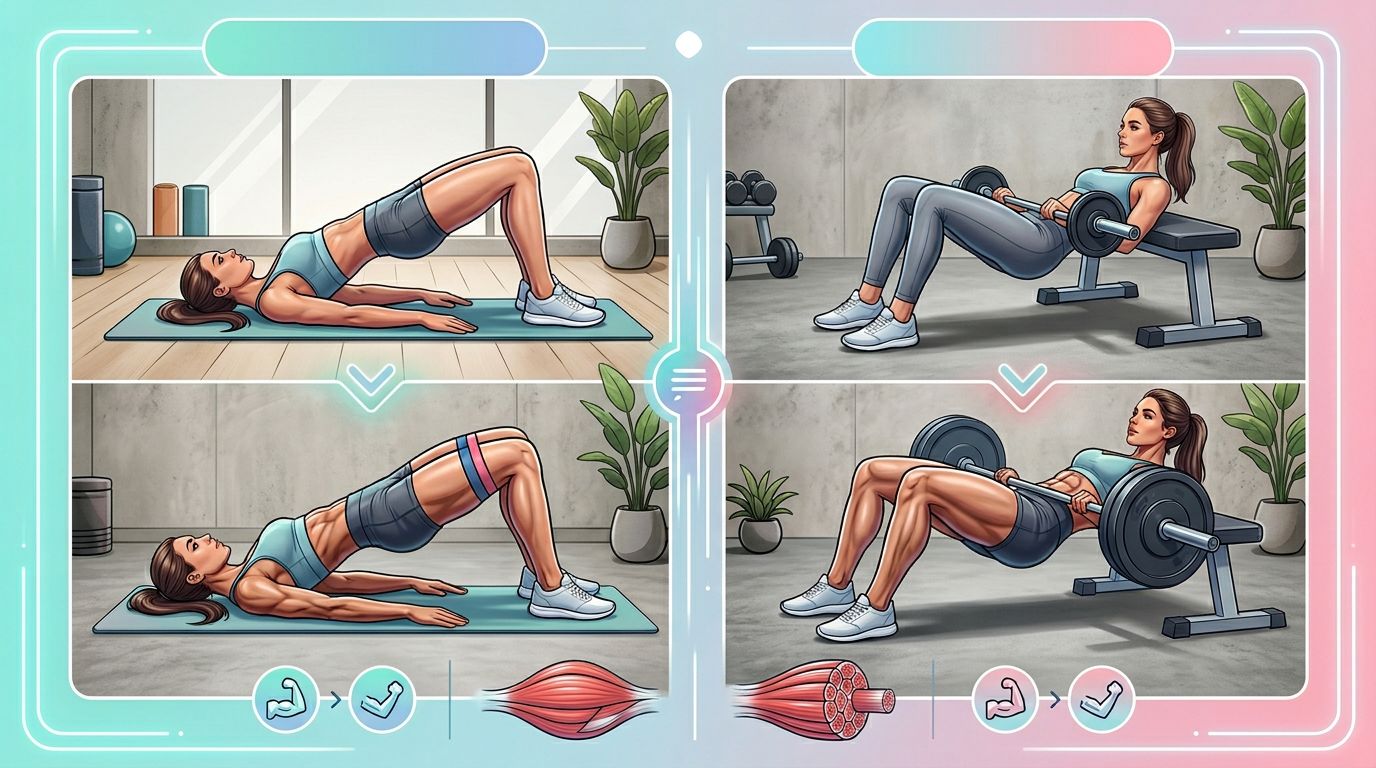
A glute bridge is a foundational exercise performed lying on your back with your shoulders and upper back in contact with the floor. Your knees are bent with feet flat on the ground, and you drive through your heels to lift your hips toward the ceiling. The movement creates a straight line from your knees through your hips to your shoulders at the top position.
This exercise can be performed with just your bodyweight, making it incredibly accessible for beginners. As you progress, you can add resistance through dumbbells, barbells, or resistance bands placed across your hips.
What Is a Hip Thrust?
A hip thrust is an elevated variation where your upper back and shoulders rest on a bench or stable platform. Your feet are planted firmly on the ground, and you drive your hips upward against resistance, typically a loaded barbell positioned across your hip crease. The elevated position allows for a greater range of motion compared to the glute bridge.
Hip thrusts require more setup and equipment but allow you to load significantly heavier weights safely. This makes them exceptional for building maximum strength and muscle mass in your glutes.
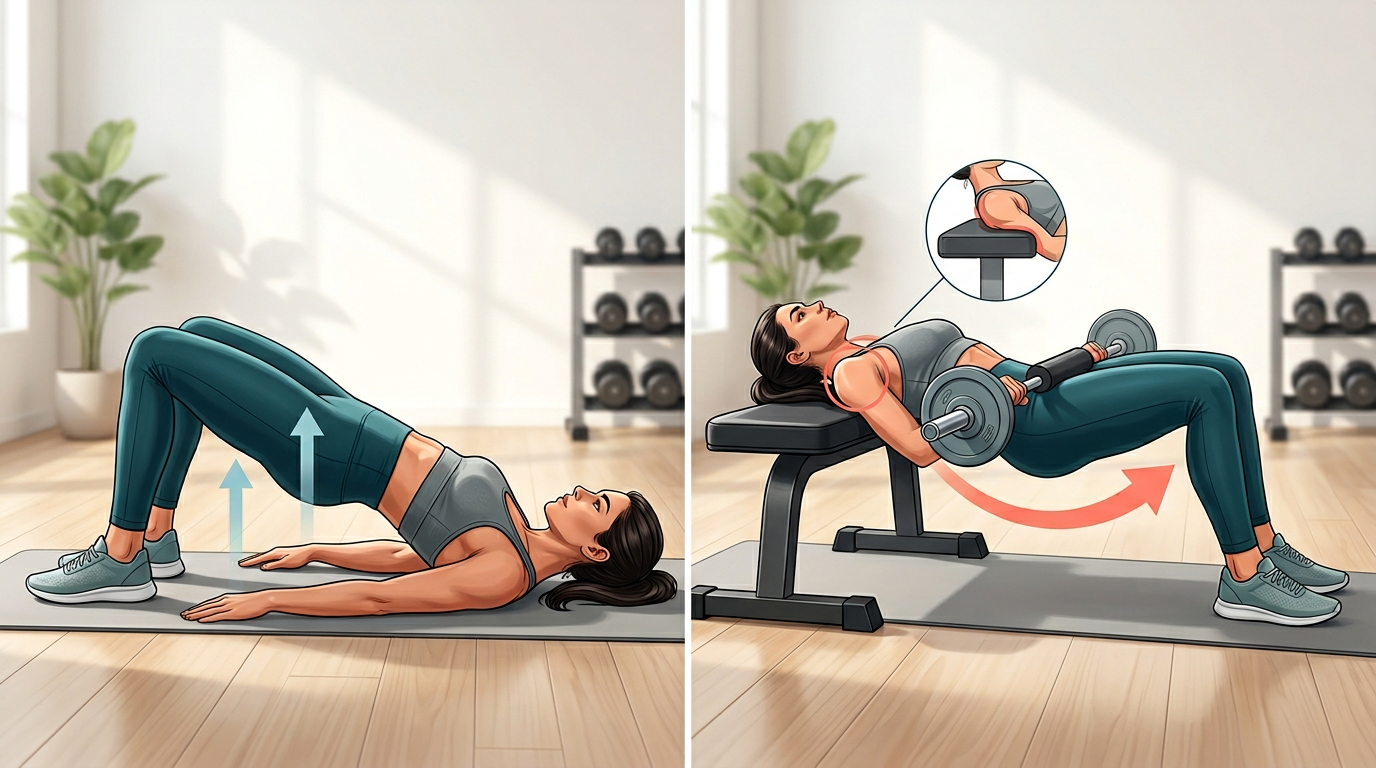
Side-by-side comparison illustration showing proper form for glute bridge (left) and hip thrust (right), highlighting the key difference in shoulder position and range of motion
The Biomechanical Differences
The primary biomechanical difference lies in the range of motion and the starting position of your torso. In a glute bridge, your hips start closer to full flexion and move through a shorter range. In a hip thrust, the elevated shoulder position allows your hips to drop lower at the bottom, creating a deeper stretch in your glutes before you drive upward.
This increased range of motion in hip thrusts means your glutes must work through a longer distance, which can lead to greater muscle development and strength gains over time. However, this doesn't make glute bridges inferior—they simply serve different purposes in a well-rounded training program.
Glute Bridge vs Hip Thrust: Side-by-Side Comparison
Feature
Glute Bridge
Hip Thrust
Equipment Needed
None required; optional weights
Bench or platform; typically barbell
Difficulty Level
Beginner-friendly
Intermediate to advanced
Range of Motion
Shorter (approximately 90-120 degrees hip extension)
Longer (approximately 60-120 degrees hip extension)
Loading Capacity
Moderate; limited by balance and setup
High; can safely load heavy weights
Muscle Activation
High glute activation; excellent for beginners
Highest glute activation in research studies
Setup Time
Quick and simple
Requires positioning and equipment setup
Best For
Beginners, home workouts, activation work
Maximum strength, muscle building, advanced training
Lower Back Stress
Lower when performed correctly
Moderate; requires proper core bracing
Muscle Activation: What the Research Shows
When examining the glute bridge vs hip thrust debate, muscle activation research provides valuable insights. Studies using electromyography (EMG) consistently show that both exercises produce high levels of gluteus maximus activation, with hip thrusts typically showing slightly higher peak activation.
Gluteus Maximus Activation
Your gluteus maximus is the primary muscle targeted by both exercises. Research indicates that hip thrusts can produce greater peak muscle activation, particularly when loaded with heavy weights. This is likely due to the increased range of motion and the ability to use heavier loads safely.
However, glute bridges still produce excellent activation levels, especially when you focus on proper form and mind-muscle connection. For many women, particularly beginners, glute bridges may actually feel more effective because they're easier to perform correctly without compensation patterns.
Hamstring and Core Engagement
Both exercises engage your hamstrings as secondary movers, but the degree of activation differs slightly. Hip thrusts tend to involve more hamstring contribution due to the increased range of motion. Your core muscles work as stabilizers in both movements, but hip thrusts require greater core bracing to maintain a neutral spine under heavier loads.
Understanding these activation patterns helps you choose the right exercise for your specific goals. If you want to minimize hamstring involvement and focus purely on glute isolation, adjusting your foot position in either exercise can help shift the emphasis.
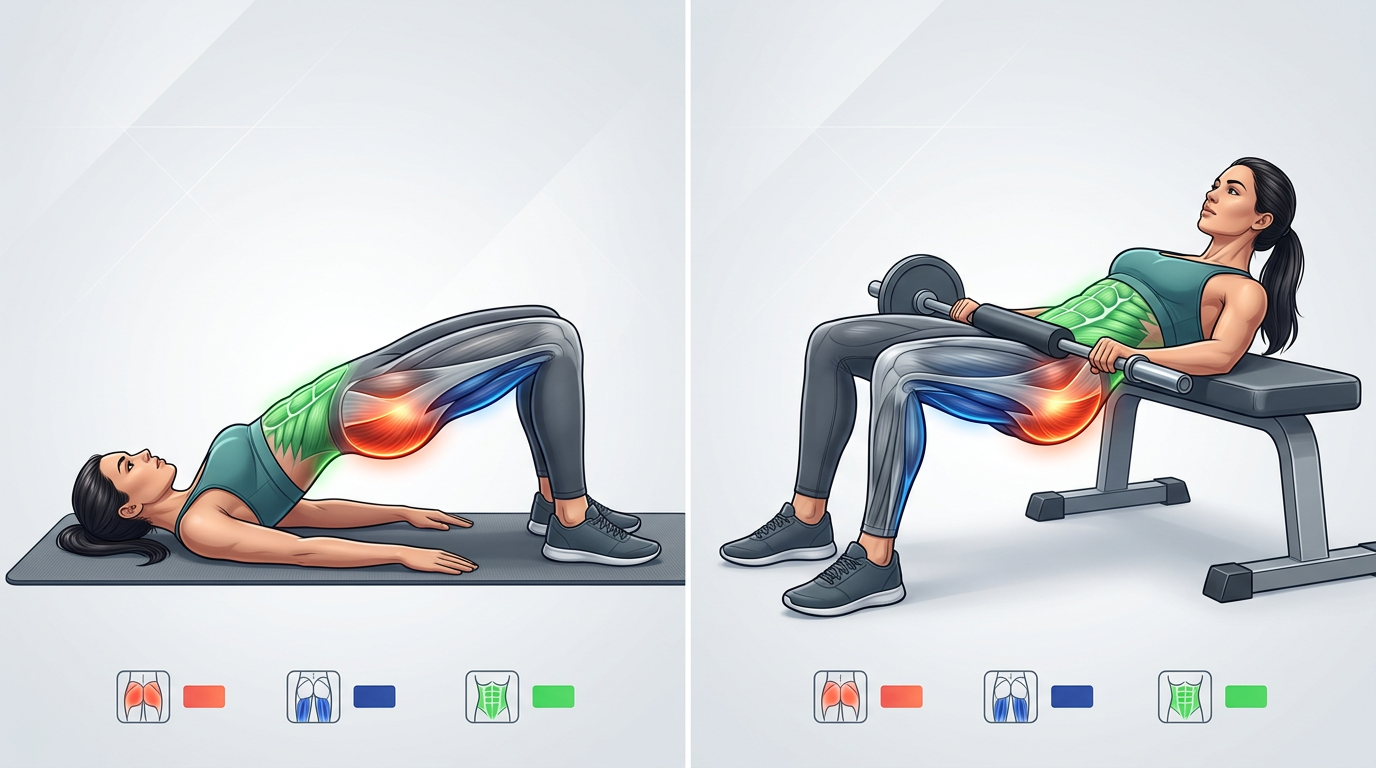
Anatomical illustration showing the primary muscles activated during glute bridge and hip thrust, with gluteus maximus, hamstrings, and core muscles highlighted
Key Differences Between Glute Bridges and Hip Thrusts
While these exercises share similarities, several key differences impact how you incorporate them into your training program. Understanding these distinctions helps you make strategic choices based on your current fitness level and goals.
Range of Motion and Stretch
The most significant difference is the range of motion. Hip thrusts allow your hips to drop below the level of your knees at the bottom position, creating a deeper stretch in your glutes. This increased stretch can enhance muscle growth through greater mechanical tension and muscle fiber recruitment.
Glute bridges maintain your shoulders on the floor, which limits how far your hips can descend. While this reduces the range of motion, it also makes the exercise more stable and easier to control, which is valuable for learning proper hip hinge mechanics.
Loading Potential and Progression
Hip thrusts win decisively when it comes to loading capacity. The elevated position and stable setup allow you to safely progress to very heavy weights—many advanced lifters can hip thrust more than they can squat or deadlift. This makes hip thrusts exceptional for progressive overload, a key principle for building strength and muscle.
Glute bridges can be loaded effectively, but there are practical limitations. Positioning a heavy barbell across your hips while lying on the floor is more awkward and potentially uncomfortable. This doesn't make them less effective, but it does mean you'll reach a loading plateau sooner than with hip thrusts.
Accessibility and Equipment Requirements
Glute bridges require nothing more than your body and a small amount of floor space. This makes them perfect for home workouts, hotel rooms, or when you're just starting out. You can add resistance with household items, resistance bands, or dumbbells as you progress.
Hip thrusts need a sturdy bench or platform at the right height, plus adequate space and equipment for loading. While this setup is standard in most gyms, it can be a barrier for home exercisers. However, creative solutions like using a couch, sturdy ottoman, or dedicated hip thrust equipment can make home hip thrusts feasible.
Similarities Between These Glute-Building Exercises
Despite their differences, glute bridges and hip thrusts share fundamental characteristics that make them both valuable for glute development. Recognizing these similarities helps you understand why both deserve consideration in your program.
Primary Movement Pattern
Both exercises are horizontal hip extension movements, meaning they involve driving your hips forward against resistance. This movement pattern directly targets your glutes in their primary function: hip extension. This is different from squats and lunges, which involve more vertical loading patterns.
The horizontal loading vector makes both exercises particularly effective for developing glute strength that transfers to activities like sprinting, jumping, and powerful hip extension in daily life.
Beginner to Advanced Scalability
Both exercises can be scaled for any fitness level. Beginners can start with bodyweight versions, while advanced lifters can add significant resistance. The progression path is clear and straightforward for both movements, making them sustainable long-term training tools.
You can also modify both exercises with tempo changes, pauses at the top, single-leg variations, and different foot positions to continue challenging your muscles as you adapt.
Low Impact on Joints
Unlike jumping or high-impact exercises, both glute bridges and hip thrusts are gentle on your joints while still providing significant muscle-building stimulus. This makes them excellent choices for women with joint concerns, those recovering from injury, or anyone seeking effective strength training without excessive wear and tear.
Which One Should You Choose? A Decision Guide
The glute bridge vs hip thrust question doesn't have a one-size-fits-all answer. Your choice depends on your training experience, available equipment, specific goals, and where you are in your fitness journey. Here's how to decide which exercise—or combination—is right for you.
Choose Glute Bridges If You:
- Are new to strength training and learning proper hip hinge mechanics
- Work out primarily at home with minimal equipment
- Want an effective warm-up or activation exercise before lower body workouts
- Experience discomfort with the hip thrust setup or bench positioning
- Prefer shorter, simpler workout sessions without extensive setup time
- Are recovering from injury and need a lower-intensity option
- Want to focus on perfecting form before progressing to more complex variations
Choose Hip Thrusts If You:
- Have mastered glute bridge form and are ready for greater loading
- Have access to gym equipment including benches and barbells
- Want to maximize glute strength and muscle development
- Are comfortable with more complex exercise setups
- Have specific strength goals that require progressive overload with heavy weights
- Are training for athletic performance requiring powerful hip extension
- Want to add variety to an established training program
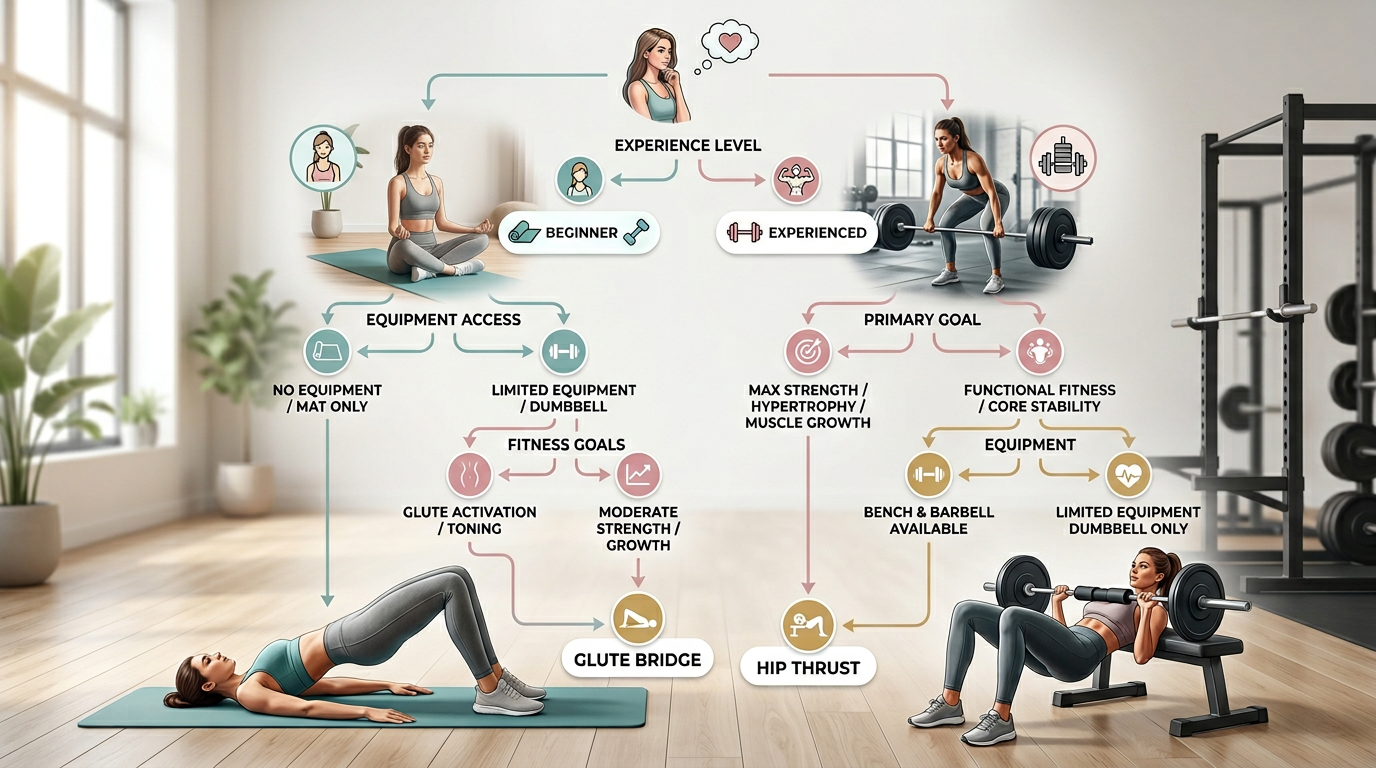
Decision tree flowchart helping readers choose between glute bridge and hip thrust based on experience level, equipment access, and fitness goals
The Best Approach: Use Both Strategically
For most women, the optimal strategy isn't choosing one over the other—it's incorporating both exercises strategically in your program. Glute bridges work excellently as activation exercises at the beginning of your workout, preparing your glutes to fire properly during heavier lifts. Hip thrusts can serve as your primary strength-building movement.
A sample weekly structure might include glute bridges as a warm-up before every lower body session, with hip thrusts programmed 2-3 times per week as a main exercise. This approach gives you the benefits of both movements without redundancy.
Proper Form and Technique for Maximum Results
Regardless of which exercise you choose, proper form is non-negotiable for both safety and results. Poor form not only reduces glute activation but can also lead to lower back discomfort and diminished results. Let's break down the essential technique cues for each movement.
Glute Bridge Form Essentials
- Starting Position: Lie on your back with knees bent and feet flat on the floor, positioned hip-width apart. Your feet should be close enough that you can barely touch your heels with your fingertips when your arms are at your sides.
- Foot Placement: Plant your feet firmly, distributing weight evenly across your entire foot. Avoid lifting your toes or heels during the movement.
- The Lift: Drive through your heels and squeeze your glutes to lift your hips toward the ceiling. Focus on pushing the floor away rather than simply lifting up.
- Top Position: Create a straight line from your knees through your hips to your shoulders. Avoid overextending your lower back—your ribs should stay down, not flaring upward.
- The Descent: Lower your hips with control, maintaining tension in your glutes rather than dropping quickly.
- Breathing: Exhale as you drive up, inhale as you lower down.
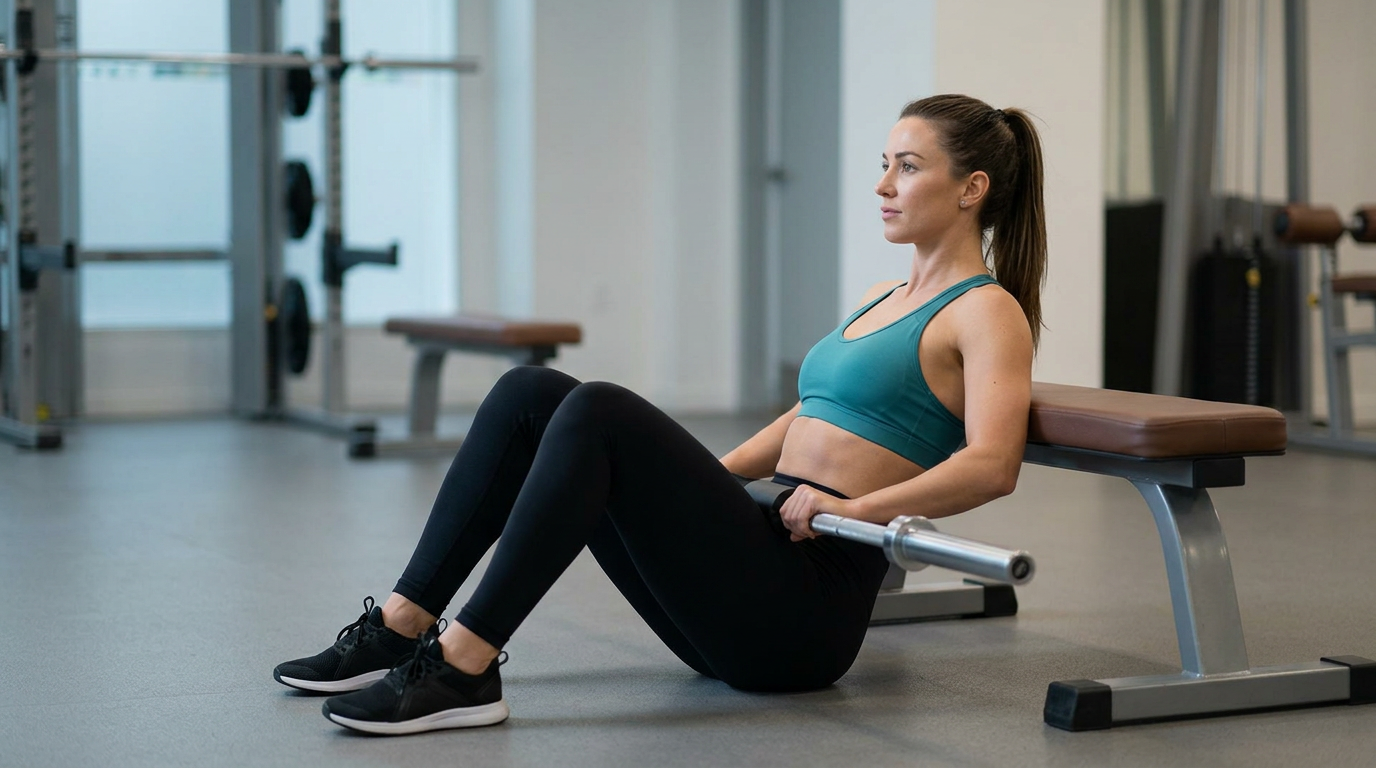
Hip Thrust Form Essentials
- Bench Setup: Position a bench or platform that's approximately 16 inches high. Your shoulder blades should rest comfortably on the bench edge when you're in the top position.
- Starting Position: Sit on the floor with your upper back against the bench edge. If using a barbell, roll it over your legs to rest in your hip crease. Use a bar pad or towel for comfort.
- Foot Position: Plant your feet flat, approximately shoulder-width apart. Your shins should be vertical at the top of the movement.
- The Thrust: Drive through your entire foot, squeezing your glutes to lift the weight. Your upper back should slide slightly up the bench as you rise.
- Top Position: Your torso should be parallel to the floor with knees at 90 degrees. Your chin should remain tucked, not looking up at the ceiling.
- Core Bracing: Maintain a strong core brace throughout the movement to protect your lower back from hyperextension.
- The Descent: Lower the weight with control, allowing your hips to drop below the level of your knees before driving back up.
Step-by-step photo sequence showing proper hip thrust form from setup through execution, with common mistakes highlighted in red X marks
Common Mistakes to Avoid
Several form errors can compromise your results and increase injury risk. Watch for these common mistakes:
- Overarching your lower back: This shifts tension away from your glutes and onto your spine. Keep your core engaged and ribs down.
- Pushing through your toes: This activates your quads more than your glutes. Focus on driving through your heels and midfoot.
- Incomplete hip extension: Not fully extending your hips at the top reduces glute activation. Squeeze your glutes hard at the peak.
- Using momentum: Bouncing or jerking through the movement reduces time under tension. Control both the lifting and lowering phases.
- Incorrect foot placement: Feet too close or too far compromise leverage and muscle activation. Adjust until your shins are vertical at the top.
Progressive Overload Strategies for Both Exercises
Building stronger, more developed glutes requires progressive overload—gradually increasing the demands on your muscles over time. Both glute bridges and hip thrusts offer multiple progression pathways to keep challenging your body as you adapt.
Progression Methods for Glute Bridges
Start with bodyweight glute bridges, focusing on perfect form and strong glute contraction. Once you can perform 3 sets of 20 repetitions with excellent control, progress using these methods:
- Add external resistance: Place a dumbbell or weight plate across your hips, starting light and gradually increasing weight
- Single-leg variation: Perform the movement on one leg to double the relative load and challenge stability
- Tempo manipulation: Slow down the lowering phase (3-5 seconds) or add a 2-3 second pause at the top
- Resistance bands: Loop a band around your thighs to add abduction resistance, or place it across your hips for additional load
- Elevated feet: Place your feet on a low platform to increase range of motion
- Barbell loading: Progress to a barbell across your hips for more significant loading potential
Progression Methods for Hip Thrusts
Hip thrusts offer exceptional loading potential. Begin with bodyweight or light loads to master the movement pattern, then progress systematically:
- Linear weight progression: Add 5-10 pounds per week as long as form remains perfect
- Volume increases: Add more sets or repetitions before increasing weight
- Single-leg hip thrusts: Advanced variation that dramatically increases difficulty and addresses imbalances
- Pause reps: Hold the top position for 2-5 seconds to increase time under tension
- Tempo variations: Experiment with 3-1-1 (3 seconds down, 1 second pause, 1 second up) or other tempo schemes
- Deficit hip thrusts: Elevate your feet slightly to increase range of motion
Sample Progression Timeline
Here's a realistic 12-week progression path combining both exercises:
Weeks 1-4 (Foundation): Bodyweight glute bridges 3x15-20, focus on form and mind-muscle connection. Add bodyweight hip thrusts 2x10-12 in week 3.
Weeks 5-8 (Adding Load): Weighted glute bridges 3x12-15 with dumbbells, barbell hip thrusts 3x8-12 with light to moderate weight.
Weeks 9-12 (Intensification): Glute bridges as activation (2x15), heavy hip thrusts 4x6-10, add single-leg variations of both exercises.
Programming Recommendations for Your Workout Routine
How you incorporate these exercises into your overall program significantly impacts your results. Strategic programming ensures adequate stimulus for growth while allowing proper recovery and preventing overtraining.
Frequency and Volume Guidelines
For optimal glute development, train your glutes 2-4 times per week with at least 48 hours between heavy sessions. Your total weekly volume should include 10-20 sets targeting your glutes across all exercises, not just bridges and thrusts.
A balanced approach might include hip thrusts as your primary exercise twice per week, with glute bridges used as activation work before other lower body exercises or as a lighter session on a third training day.
Sample Weekly Training Splits
Beginner Program (2x per week):
- Day 1: Glute bridges 3x15, Goblet squats 3x10, Romanian deadlifts 3x12
- Day 2: Glute bridges 3x12 (weighted), Walking lunges 3x10 per leg, Leg curls 3x12
Intermediate Program (3x per week):
- Day 1 (Heavy): Glute bridges 2x15 (activation), Barbell hip thrusts 4x8, Bulgarian split squats 3x10
- Day 2 (Moderate): Back squats 4x8, Romanian deadlifts 3x10, Single-leg glute bridges 3x12
- Day 3 (Light/Metabolic): Banded glute bridges 3x20, Step-ups 3x12, Glute-focused circuits
Advanced Program (4x per week):
- Day 1: Heavy hip thrusts 5x5, Pause glute bridges 3x10
- Day 2: Squats and quad-focused work with glute bridge activation
- Day 3: Moderate hip thrusts 3x10-12, Single-leg variations
- Day 4: Deadlift variations with glute bridge finisher 3x15-20
Pairing with Other Exercises
Both glute bridges and hip thrusts pair well with other lower body movements. Use glute bridges as activation work before squats, deadlifts, or lunges to ensure your glutes fire properly during these compound movements. Hip thrusts work well as the first main exercise in a glute-focused session, when you're fresh and can handle maximum loads safely.
Avoid programming multiple heavy hip hinge movements (deadlifts, Romanian deadlifts, hip thrusts) in the same session, as this can lead to excessive lower back fatigue. Instead, balance hip-dominant exercises with knee-dominant movements like squats and lunges.
Addressing Lower Back Pain and Knee Discomfort
Many women wonder whether glute bridges can help with lower back pain or knee discomfort. The answer is nuanced and depends on the underlying cause of your pain.
Glute Bridges and Lower Back Pain
Weak glutes often contribute to lower back pain because your body compensates by overusing your lower back muscles during daily activities. Strengthening your glutes through properly performed glute bridges can reduce lower back stress by teaching your body to use the right muscles for hip extension.
However, if you experience pain during glute bridges, you may be hyperextending your lower back instead of fully engaging your glutes. Focus on these corrections:
- Keep your ribs down and core braced throughout the movement
- Think about tucking your pelvis slightly at the top rather than arching your back
- Reduce range of motion until you can maintain neutral spine alignment
- Ensure you're squeezing your glutes hard at the top, not just pushing your hips up
If lower back pain persists during glute bridges, consult a healthcare professional or physical therapist to address any underlying issues before continuing.
Glute Bridges and Knee Pain
Glute bridges can help with certain types of knee pain, particularly when knee discomfort stems from weak glutes and poor hip stability. Strong glutes help control femur rotation and knee tracking during activities like walking, running, and climbing stairs.
If you experience knee pain during glute bridges, check these factors:
- Foot position: Feet too far from your body can stress your knees. Adjust placement until your shins are more vertical
- Knee alignment: Ensure your knees track in line with your toes, not caving inward or splaying outward
- Weight distribution: Drive through your heels and midfoot, not your toes
- Range of motion: Reduce how high you lift if you feel knee discomfort at the top position
For knee pain related to patellofemoral syndrome or IT band issues, strengthening your glutes through pain-free ranges can be therapeutic. However, sharp or worsening knee pain requires professional evaluation.
The Verdict: Which Exercise Builds Better Results?
After examining the glute bridge vs hip thrust comparison from every angle, here's the bottom line: hip thrusts are superior for maximum strength and muscle development due to their greater loading capacity and range of motion, but glute bridges are more accessible, require less equipment, and remain highly effective for building strong glutes.
For beginners, glute bridges are the clear starting point. They teach proper hip extension mechanics, require no equipment, and build a foundation of glute strength and activation. As you progress and gain access to appropriate equipment, hip thrusts become the logical next step for continued development.
The most effective approach for most women is incorporating both exercises strategically: use glute bridges for activation, warm-ups, and lighter training days, while making hip thrusts your primary strength-building exercise when you're ready for heavier loads.
Your individual results will depend more on consistent progressive overload, proper form, and adequate recovery than on which exercise you choose. Both movements, when performed correctly and programmed intelligently, will build the strong, functional glutes you're working toward.
Before and after comparison chart showing typical strength and muscle development progression over 12 weeks using glute bridges versus hip thrusts
Frequently Asked Questions
What is the #1 best glute exercise?
Hip thrusts are widely considered the most effective single exercise for glute development due to their high muscle activation, heavy loading capacity, and optimal horizontal loading vector. However, the best exercise for you depends on your experience level, equipment access, and individual biomechanics. A comprehensive glute program includes multiple exercises targeting different angles and movement patterns.
Do glute bridges grow glutes?
Yes, glute bridges effectively build glute muscle when performed with progressive overload. They produce high gluteus maximus activation and allow for continuous tension throughout the movement. Adding weight progressively, increasing repetitions, or using single-leg variations ensures continued muscle growth. Consistency and proper form are essential for results.
Can glute bridges help with lower back pain?
Glute bridges can help reduce lower back pain caused by weak glutes and poor hip extension mechanics. Strengthening your glutes reduces compensation patterns that overload your lower back during daily activities. However, maintain neutral spine alignment and avoid hyperextension during the exercise. If pain persists, consult a healthcare professional.
Can glute bridges help with knee pain?
Glute bridges can help with knee pain related to weak hip stabilizers and poor knee tracking. Strong glutes improve femur control and knee alignment during movement. Ensure proper foot placement with shins relatively vertical and knees tracking over toes. Sharp or worsening knee pain requires professional evaluation before continuing exercise.
How often should I do glute bridges or hip thrusts?
Train glutes 2-4 times per week with at least 48 hours between heavy sessions. You can perform glute bridges more frequently as activation work, while limiting heavy hip thrusts to 2-3 times weekly. Total weekly volume should include 10-20 sets across all glute exercises for optimal development and recovery.
Can I do both glute bridges and hip thrusts in the same workout?
Yes, using glute bridges as activation before hip thrusts is an effective strategy. Perform 2-3 sets of bodyweight or lightly loaded glute bridges to activate your glutes, then progress to heavier hip thrusts as your main exercise. This approach enhances mind-muscle connection and optimizes performance on your primary movement.
How much weight should I use for hip thrusts?
Start with bodyweight or an empty barbell to master form, then add weight gradually. Many women progress to hip thrusting their bodyweight or more within several months. Focus on maintaining perfect form with controlled tempo rather than rushing to heavy weights. Add 5-10 pounds per week as long as form remains excellent.
Conclusion
The glute bridge vs hip thrust debate doesn't require choosing one exercise over the other. Both movements effectively build glute strength and development when programmed intelligently. Hip thrusts offer superior loading capacity and range of motion for maximum muscle growth, while glute bridges provide accessibility, simplicity, and excellent activation for all fitness levels.
Your best strategy is incorporating both exercises based on your current experience, available equipment, and training goals. Start with glute bridges to build a solid foundation, then progress to hip thrusts as you develop strength and access to proper equipment. Use glute bridges for activation work and lighter training days, while making hip thrusts your primary strength builder.
Remember that consistency, progressive overload, and proper form matter far more than which exercise you choose. Focus on gradually increasing demands on your muscles over time, maintain excellent technique, and trust the process. Strong glutes are built through dedicated effort and smart programming, regardless of whether you're bridging or thrusting your way to results.