Dead hang benefits include improved grip strength, shoulder decompression, enhanced posture, and spinal traction. This simple bodyweight exercise strengthens your upper body, relieves tension from daily sitting, and builds foundational strength for pull-ups while requiring only a pull-up bar and your commitment.
Introduction
Have you ever noticed how much tension you carry in your shoulders after a long day at your desk? Your body is craving relief, and the solution might be simpler than you think. Dead hang benefits extend far beyond just building grip strength – this fundamental exercise can transform your shoulder health, posture, and overall upper body function.
Created by certified trainer Shelley Darlington with 15+ years experience, this comprehensive guide explores everything you need to know about incorporating dead hangs into your training routine. Whether you're new to strength training or looking to enhance your current program, understanding how to dead hang benefits your body can unlock new levels of functional fitness.
In this guide, you'll discover the science-backed advantages of dead hangs, learn proper technique to maximize results while avoiding injury, and get practical strategies for progressing from your first hang to building impressive endurance. Let's explore why this deceptively simple exercise deserves a place in your workout routine.
Key Takeaways
- Dead hangs decompress your spine and shoulders, counteracting the effects of prolonged sitting and poor posture
- Regular practice builds exceptional grip strength that transfers to all pulling exercises and daily activities
- Starting with just 10-20 seconds and progressively increasing duration yields the best results without overtraining
- Proper form requires active shoulder engagement rather than completely relaxed hanging to protect joint health
- Dead hangs serve as an excellent foundation for developing pull-up strength and shoulder mobility
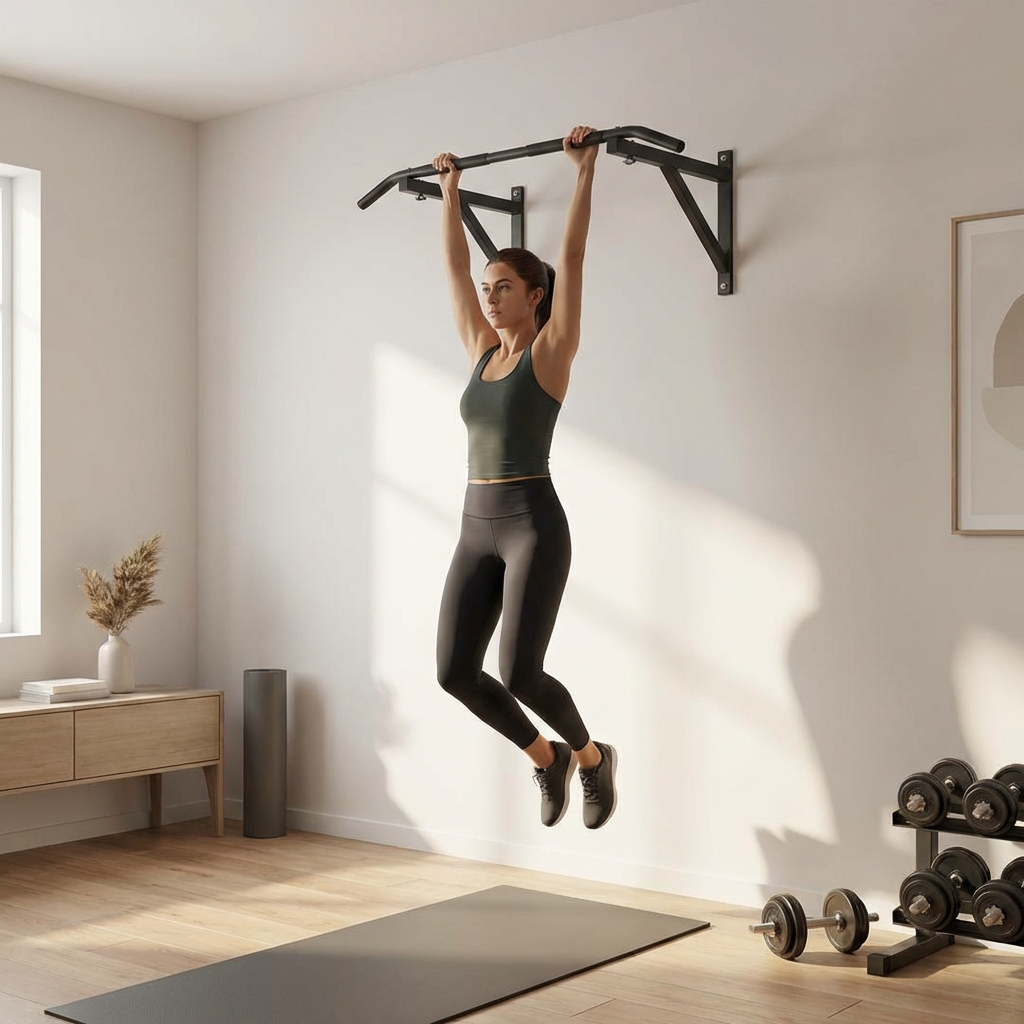
Woman performing a dead hang exercise on a pull-up bar in a home gym setting, demonstrating proper form with engaged shoulders and neutral spine
What Is a Dead Hang and Why It Matters
A dead hang is exactly what it sounds like – hanging from a bar with your arms fully extended, supporting your entire bodyweight. Despite its simplicity, this exercise delivers remarkable benefits for women 35+ focused on strength training and body recomposition.
The Anatomy of a Proper Dead Hang
A true dead hang involves gripping an overhead bar with both hands and allowing your body to hang freely while maintaining active shoulder engagement. Your arms should be fully extended, but your shoulders shouldn't collapse into your ears. This distinction is crucial for safety and effectiveness.
The exercise primarily targets your forearms, hands, lats, shoulders, and core stabilizers. Your grip muscles work constantly to maintain your hold, while your shoulder stabilizers prevent joint damage by keeping everything properly aligned.
Why Dead Hangs Are Essential for Modern Life
Our daily habits – typing, driving, scrolling – create chronic shoulder tension and forward head posture. Dead hangs provide the opposite movement pattern, opening your chest and decompressing your spine. This counterbalance is essential for maintaining shoulder health and preventing the rounded posture that develops from desk work.
For women building strength, dead hangs serve as a gateway exercise. They build the foundational grip and shoulder strength required for more advanced movements like pull-ups, while also improving your ability to perform everyday tasks like carrying groceries or lifting objects overhead.
The Science-Backed Dead Hang Benefits
Understanding what is dead hang benefits from a physiological perspective helps you appreciate why this exercise deserves your attention. Research supports multiple advantages that extend throughout your entire body.
Spinal Decompression and Pain Relief
Dead hangs create traction in your spine, temporarily increasing the space between vertebrae and reducing pressure on spinal discs. This decompression effect can provide relief from back pain caused by compression and poor posture.
Gravity works in your favor during a dead hang, gently stretching your spine in a way that's difficult to achieve through other exercises. Based on feedback from thousands of Strong Curves app users, many women report reduced lower back discomfort after consistently incorporating dead hangs into their routines.
Superior Grip Strength Development
Your grip strength directly correlates with your overall functional fitness and longevity. Dead hangs challenge your forearm muscles, finger flexors, and hand strength in a way that translates to better performance in virtually every pulling exercise.
The benefits include:
- Enhanced performance in rows, deadlifts, and pull-ups
- Improved ability to carry heavy objects without dropping them
- Reduced risk of grip failure limiting your strength training progress
- Better hand endurance for activities requiring sustained gripping
- Increased forearm muscle development and definition
Shoulder Health and Mobility Improvements
Dead hangs promote shoulder joint health by encouraging proper positioning and strengthening the stabilizing muscles around your shoulder complex. This exercise stretches your lats, pecs, and anterior deltoids while strengthening your rotator cuff muscles.
Regular dead hanging can improve your overhead range of motion, making everyday movements like reaching high shelves more comfortable and reducing injury risk during pressing exercises. The shoulder decompression effect creates space in the joint capsule, which can alleviate impingement issues that cause pain during arm movements.

Anatomical illustration showing the muscles engaged during a dead hang, highlighting forearms, lats, shoulders, and core stabilizers with labels
Core Engagement and Postural Benefits
While hanging, your core muscles work to stabilize your torso and prevent excessive swinging. This isometric contraction strengthens your abs and obliques without the spinal compression that comes with traditional crunches.
The postural improvements from dead hangs are particularly valuable. The exercise naturally pulls your shoulders back and down, counteracting the forward shoulder roll that develops from desk work and phone use. Over time, this can lead to improved standing posture and reduced neck tension.
Best Dead Hang Benefits for Different Fitness Goals
The versatility of dead hangs means they support various training objectives. Here's how this exercise aligns with different fitness goals.
For Pull-Up Progression
Dead hangs build the foundational strength required for pull-ups. Before you can pull yourself up, you need to comfortably hang and control your body position. The Strong Curves glute-focused approach to functional fitness emphasizes building strength progressively, and dead hangs represent the first step in the pull-up journey.
Start with basic dead hangs, then progress to scapular pulls (slightly pulling your shoulder blades down while hanging), and eventually to negative pull-ups. This systematic progression prevents frustration and builds lasting strength.
For Shoulder Pain Prevention and Recovery
If you experience shoulder discomfort from overhead pressing or have a history of shoulder issues, dead hangs can be therapeutic. The traction effect creates space in your shoulder joint, reducing impingement and allowing better fluid circulation for healing.
Always consult a healthcare provider before using dead hangs for injury recovery, but many physical therapists recommend them as part of shoulder rehabilitation protocols. The key is starting gently and never pushing through sharp pain.
For Improved Athletic Performance
Athletes in sports requiring grip strength – from rock climbing to tennis – benefit tremendously from dead hangs. The exercise builds the hand and forearm endurance that prevents grip fatigue during competition.
Additionally, the core stability developed through hanging transfers to rotational sports and movements requiring torso control. Your improved shoulder mobility also enhances throwing mechanics and overhead movements.
How to Perform a Dead Hang: Step-by-Step Guide
Proper technique ensures you maximize dead hang benefits while protecting your joints. Follow this dead hang benefits guide for optimal results.
Setting Up for Success
Choose a pull-up bar that allows you to hang with your feet off the ground. Your bar should be high enough that you can fully extend your arms without your feet touching the floor. If you're using a doorway pull-up bar at home, ensure it's properly installed and rated for your bodyweight.
The Perfect Dead Hang Technique
- Grip the bar: Use an overhand grip (palms facing away) slightly wider than shoulder-width. Wrap your thumbs around the bar for maximum security.
- Engage your shoulders: Before releasing your feet, pull your shoulder blades slightly down and back. Your shoulders shouldn't be shrugged up by your ears.
- Lift your feet: Slowly lift your feet off the ground or step stool, allowing your full bodyweight to hang from the bar.
- Maintain alignment: Keep your body in a relatively straight line. Avoid excessive arching or swinging.
- Breathe naturally: Don't hold your breath. Maintain steady breathing throughout the hang.
- Hold the position: Maintain your hang for your target duration, keeping your shoulders actively engaged.
- Dismount safely: When finished, carefully place your feet back on the ground or step – don't drop suddenly.
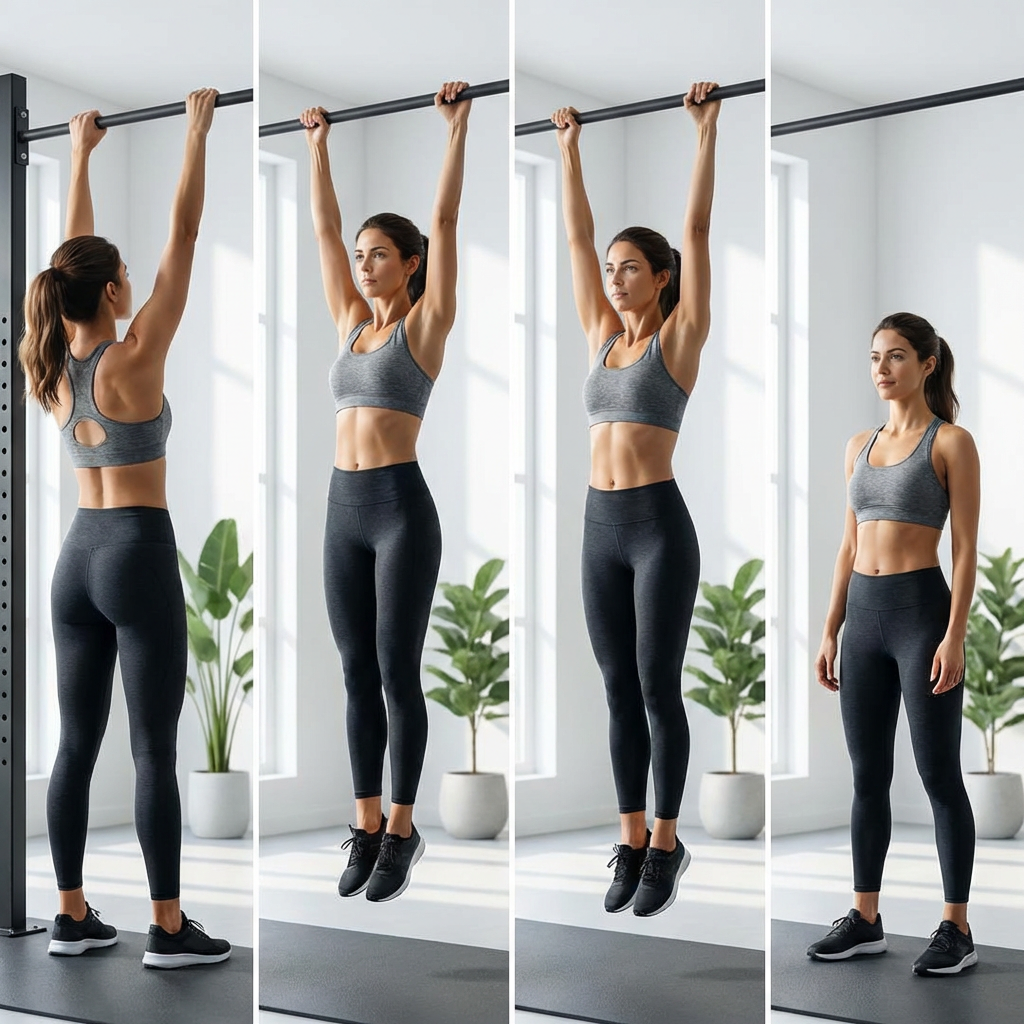
Step-by-step photo sequence showing a woman performing a dead hang from setup to proper hanging position to safe dismount
Common Mistakes to Avoid
Even with a simple exercise like dead hangs, form matters. Watch out for these errors:
- Completely relaxed shoulders: Letting your shoulders collapse into your ears puts excessive stress on the joint capsule
- Swinging or kipping: Excessive momentum reduces the stabilization benefits and can strain your shoulders
- Gripping too narrow or too wide: Extreme grip widths can create uncomfortable shoulder angles
- Holding your breath: This increases blood pressure unnecessarily and reduces your hang time
- Dropping from the bar: Sudden dismounts can jar your spine and shoulders
Dead Hang Benefits Tips: Progression and Programming
Strategic progression ensures continuous improvement while avoiding overuse injuries. These dead hang benefits tips will help you advance safely.
Starting Guidelines for Beginners
If you're new to dead hangs, start with 10-20 second holds and focus on maintaining proper shoulder engagement rather than duration. It's better to perform multiple shorter sets with excellent form than one long hang with compromised technique.
Trusted by over 50,000 women worldwide, our progressive approach emphasizes quality over quantity. Begin with 3-4 sets of 10-20 seconds, resting 60-90 seconds between sets. Perform this routine 2-3 times per week, allowing recovery days between sessions.
Intermediate Progression Strategies
Once you can comfortably hold a dead hang for 30 seconds with good form, you can progress through several methods:
- Increase duration by 5-10 seconds each week until you reach 60 seconds
- Add scapular pulls – slightly pulling your shoulder blades down while hanging
- Experiment with different grip widths to challenge stability differently
- Try single-arm hangs (assisted with the other hand) for advanced grip strength
- Incorporate weighted hangs using a weight vest or dip belt
Sample Weekly Programming
Integrate dead hangs into your existing routine without overwhelming your recovery capacity. Here's a balanced approach:
Week 1-4 (Building Foundation):
- Monday: 4 sets of 15-20 seconds
- Thursday: 4 sets of 15-20 seconds
Week 5-8 (Increasing Duration):
- Monday: 3 sets of 30 seconds
- Thursday: 4 sets of 25 seconds
Week 9-12 (Advanced Work):
- Monday: 2 sets of 45 seconds + 2 sets of scapular pulls (8-10 reps)
- Thursday: 3 sets of 40 seconds
Maximizing Your Dead Hang Benefits Results
Getting the most from your dead hang practice requires attention to several supporting factors beyond just hanging time.
Recovery and Frequency Considerations
Your grip and forearm muscles need adequate recovery between sessions. Training dead hangs 2-4 times per week provides optimal stimulus without overtraining these smaller muscle groups. If you notice persistent forearm soreness or reduced grip strength, you may be training too frequently.
Listen to your body's signals. Some muscle fatigue is normal, but sharp pain in your elbows, wrists, or shoulders indicates you need more recovery time or should check your form.
Complementary Exercises
Combine dead hangs with other movements for comprehensive upper body development. Consider pairing them with shoulder mobility exercises to enhance flexibility, or incorporate them into your pull-day workout routine for synergistic strength gains.
Wrist curls, reverse curls, and farmer's carries complement dead hangs by strengthening your grip from different angles. Core work like planks and hollow body holds enhance the stability benefits you gain from hanging.
Equipment and Setup Optimization
Invest in a quality pull-up bar that feels comfortable in your hands. Bars with excessive diameter can make gripping difficult, while those that are too thin may cause hand discomfort during longer hangs.
If you have a home gym, consider multiple grip options – a standard pull-up bar, gymnastic rings, or a multi-grip bar. Each variation challenges your grip and shoulders slightly differently, providing more comprehensive development.
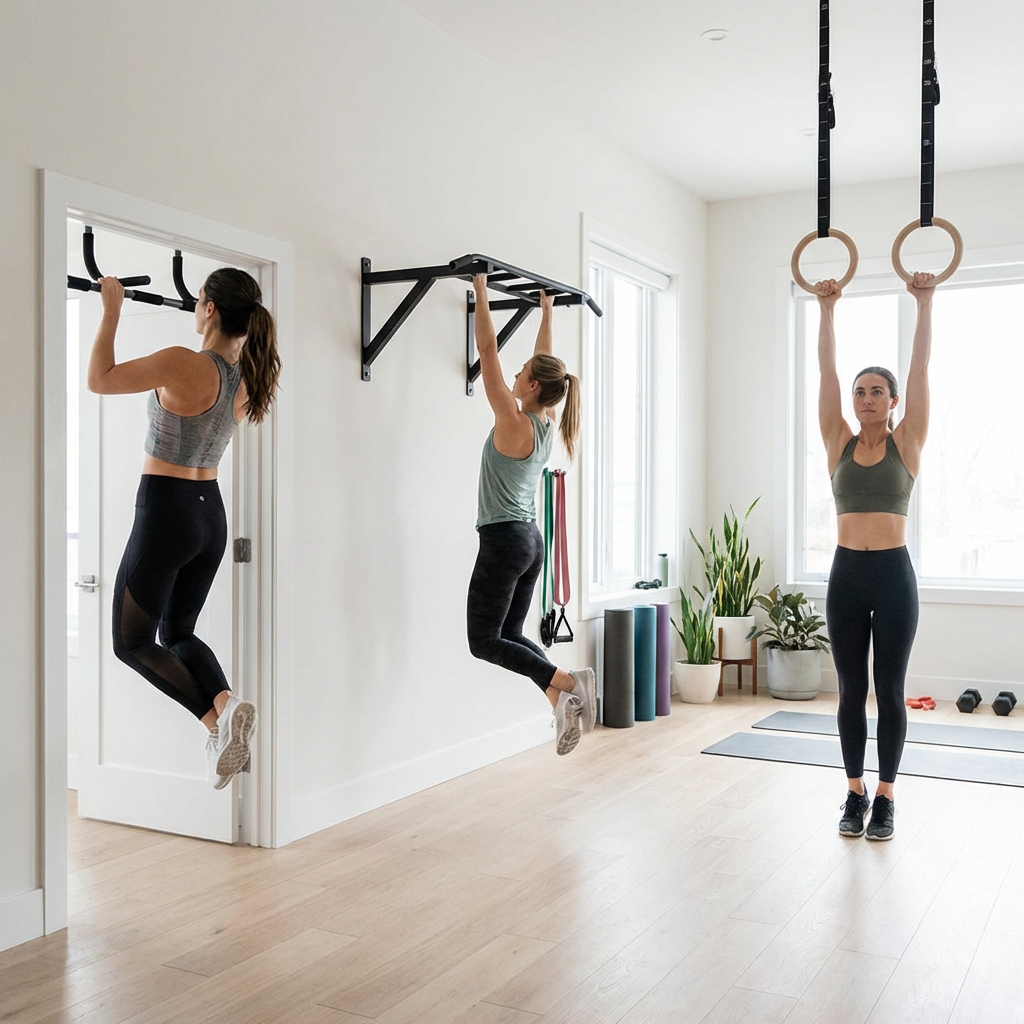
Home gym setup showing various pull-up bar options including doorway bar, wall-mounted bar, and gymnastic rings for dead hang variations
Special Considerations and Modifications
Dead hangs are accessible to most people, but certain situations require modifications or extra caution.
For Those with Limited Grip Strength
If you can't maintain a hang for even 10 seconds, use assistance strategies. Place a box or bench under the bar so your feet can touch lightly, reducing the load on your hands. Gradually decrease the assistance as your grip improves.
Lifting straps can also help you build hanging endurance while your grip catches up. Use them sparingly – perhaps for one set after your unassisted sets – so you still develop natural grip strength.
Adaptations for Shoulder Issues
If you have existing shoulder problems, start conservatively. Use a neutral grip (palms facing each other) if available, as this position is often more comfortable for sensitive shoulders. Begin with very short hangs of just 5-10 seconds and progress slowly.
Some people find that a slightly narrower grip reduces shoulder discomfort. Experiment with hand positioning to find what feels best for your body structure.
Pregnancy and Postpartum Modifications
During pregnancy, dead hangs may feel uncomfortable as your center of gravity shifts. If you've been doing them regularly, you can often continue into the second trimester, but listen to your body and stop if you experience any discomfort.
Postpartum, wait until you've been cleared for exercise by your healthcare provider. Start with shorter durations than your pre-pregnancy baseline, as your connective tissues need time to regain their normal tension after relaxin hormone effects.
Tracking Progress and Setting Goals
Measurable progress keeps you motivated and helps you identify when to advance your training.
Key Metrics to Monitor
Track these variables to document your improvement:
- Maximum hang time: Your longest single hang duration
- Total hang volume: Combined time across all sets in a session
- Grip variations: Different grip widths or styles you can perform
- Subjective difficulty: How challenging the hang feels on a 1-10 scale
- Recovery time needed: How quickly your grip recovers between sets
Realistic Timeline Expectations
Progress varies based on starting strength, consistency, and recovery factors. Generally, expect these milestones:
Weeks 1-4: Building from 10-15 seconds to 25-30 seconds
Weeks 5-8: Reaching 45-60 second hangs consistently
Weeks 9-12: Comfortable 60+ second hangs, ready for advanced variations
Remember that progress isn't always linear. Some weeks you'll see dramatic improvements, while others may feel like plateaus. Consistency matters more than perfection.
Celebrating Milestones
Acknowledge your achievements along the way. Your first 30-second hang deserves recognition. So does your first scapular pull or the day you realize your grip no longer fails during deadlift training. These small wins build the confidence and momentum that lead to long-term success.
Frequently Asked Questions
How long should you dead hang for?
Beginners should start with 10-20 second hangs for 3-4 sets, focusing on proper shoulder engagement. Intermediate trainees can aim for 30-45 seconds, while advanced individuals may hold 60+ seconds. Quality always matters more than duration, so maintain active shoulders throughout.
Is 1 minute dead hang good?
A 60-second dead hang demonstrates excellent grip strength and shoulder stability. This milestone indicates you're ready for advanced variations like weighted hangs, scapular pulls, or pull-up training. Most people require 8-12 weeks of consistent practice to reach this level.
What happens if I dead hang everyday?
Daily dead hangs can lead to overuse injuries in your forearms, elbows, and shoulders if volume isn't managed carefully. For best results, practice 2-4 times weekly with rest days between sessions. If you prefer daily practice, keep sessions very short and monitor for persistent soreness.
Do dead hangs actually decompress your spine?
Yes, dead hangs create traction that temporarily increases space between vertebrae, decompressing spinal discs. This effect provides relief from compression-related back pain and counteracts daily sitting posture. The decompression is temporary but beneficial when performed regularly as part of balanced training.
Can dead hangs help with shoulder impingement?
Dead hangs can relieve shoulder impingement by creating space in the joint capsule and strengthening stabilizer muscles. Start with very short hangs and use a neutral grip if available. Always consult a healthcare provider for persistent shoulder pain before self-treating with exercise.
What's the difference between active and passive dead hangs?
Active dead hangs involve engaging your shoulder stabilizers by pulling your shoulder blades slightly down and back, protecting the joint. Passive hangs allow complete relaxation, which can stress shoulder ligaments. Active hangs are safer and more beneficial for building functional strength and stability.
Do I need special equipment for dead hangs?
You only need a sturdy pull-up bar capable of supporting your bodyweight. Doorway bars, wall-mounted bars, or playground equipment all work effectively. Optional accessories like lifting straps can assist beginners with limited grip strength, but aren't necessary for most people.
Conclusion
The dead hang benefits extend far beyond simple grip strength, offering comprehensive improvements to your shoulder health, posture, spinal decompression, and functional fitness. This accessible exercise requires minimal equipment yet delivers maximum results when performed consistently with proper technique.
Key points to remember:
- Start with short 10-20 second hangs and progress gradually to avoid overuse injuries
- Maintain active shoulder engagement rather than completely passive hanging for joint protection
- Practice 2-4 times weekly, allowing adequate recovery between sessions
- Dead hangs provide spinal decompression, improved grip strength, and enhanced shoulder mobility
- The exercise serves as an excellent foundation for pull-up progression and overall upper body strength
Whether you're looking to relieve shoulder tension from desk work, build the strength for your first pull-up, or simply enhance your functional fitness, dead hangs deserve a place in your training program. The simplicity of this exercise makes it easy to start today – all you need is a bar and the commitment to hang in there.
Ready to experience these transformative dead hang benefits for yourself? The Strong Curves app provides structured programming that incorporates dead hangs alongside comprehensive strength training designed specifically for women. Download the app today and join thousands of women building strength, confidence, and lasting fitness results through science-backed training methods.